

Importing some data
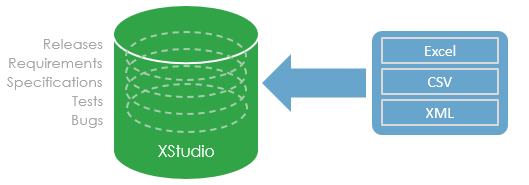
In this tutorial you will learn how to import some data from different formats.The format we'll look at more precisely is Excel as this is by far what is the most spread in the market to export data and also the most used by specifications and tests designers when they do not have a proper test management system.
From Excel
Process
From XStudio.web's menu select theProfile menu item and choose Import data.From XStudio's menu select the
Tools menu item and choose Import from Excel.
Select which types of data you're about to import and if necessary the conflict rule you want to use if the data you're importing already exist in the database.
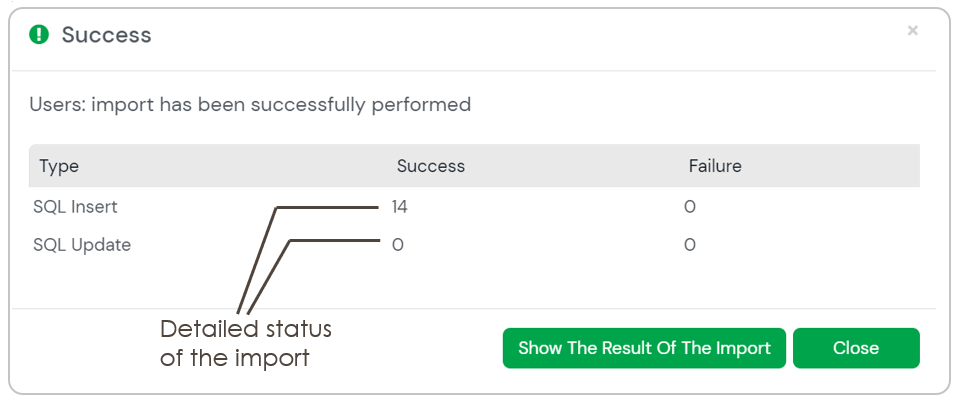
Click on the Open button to pick the source Excel file containing the data and press Submit. After the import is completed, a popup will show the resulting statistics.
Format of the input Excel files
The format of the Excel file will differ depending on what it contains but his main characteristics will be identical:- The data will be imported by default from the first sheet of the workbook (except if you're importing a bundle)
- The first row is ignored and used only as an helper for the writer
- The sheet must contains a series of columns containing all the mandatory information required by the format
- When a cell is empty, it is interpreted as if there is no change from the cell in the same column in the previous row(s). This make a clearer view. However, this is not mandatory to do so.
- An empty row is interpreted as the end of the sheet
- The sheet can contain a variable number of optional columns at the end which corresponds to the custom fields used in XStudio.
In this case, the title in the first row indicates the name of the custom field.
In the samples below, the headers of those columns have a grey background.
In the case of the test and test case import, you can even have optional columns for test custom fields, test attributes and test case custom fields. These fields MUST be provided in this specific order.
Note that the custom fields must already exist before you import the Excel file.
You will find below a sample of each format.
Downloadable example: SUT Excel file
Downloadable example: Requirements Excel file

Downloadable example: Specifications Excel file

Downloadable example: Tests and test cases Excel file
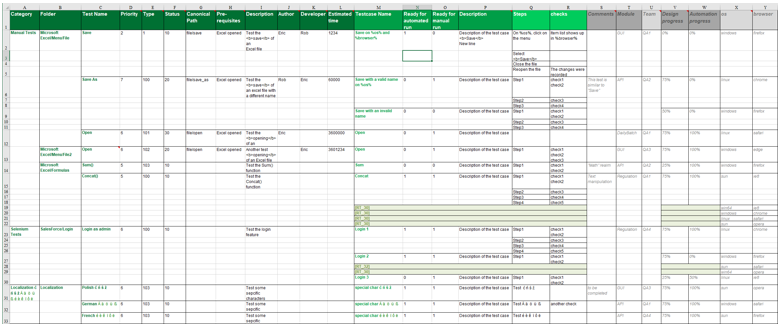
The Tests import template is the most complex template as it includes different type of data within the same sheet:
- Tests (dark green)
- Test cases (green)
- Steps and expected results (light green)
- Custom fields, attributes etc. (grey)
But you have not to do that. The parser will analyze the data and will interpret empty cells accordingly to previous rows.
for instance:
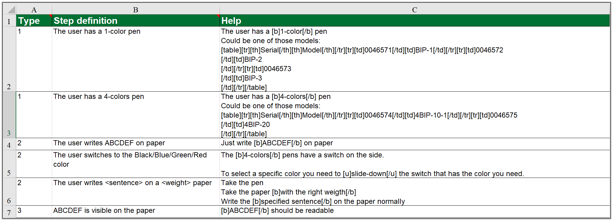
Downloadable example: Gherkin steps Excel file
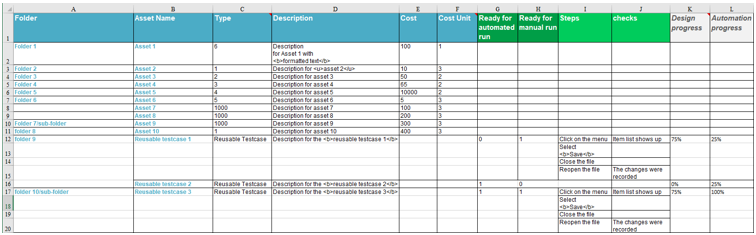
Downloadable example: Assets and Reusable testcases Excel file
Downloadable example: Campaigns, session and results Excel file

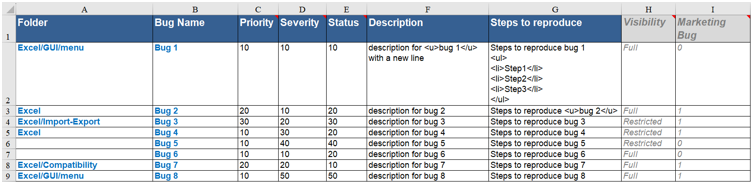
Downloadable example: Bugs Excel file
Downloadable example: Users Excel file

Special case: it is also possible to import test and testcase results from an Excel file.
To do this, you need to select a session then use the dedicated button and provide an excel format
Downloadable example: Results Excel file
To do this, you need to select a session then use the dedicated button and provide an excel format
Downloadable example: Results Excel file
You can also import the links in between the items you already imported. To do so you just need to refer the source and destination items by their unique path and name in your Excel file.
Downloadable example: SUT-Requirements links Excel file

Downloadable example: Requirements-Specifications links Excel file

Downloadable example: Requirements inner links Excel file

Downloadable example: Specifications-Tests links Excel file

Downloadable example: Specifications inner links Excel file

Downloadable example: Requirements-Tests links Excel file

There is also the possibility to import some bundles. A bundle is basically an Excel file including several sheets. Each sheet must match one of the format described above. So for instance you could have one excel file including some requirements, some tests and the links in between those in three different sheets. This is what is expected when you pick the QC bundle option. Requirements are expected in the first sheet, Tests in the second and links in between the requirements and the tests in the third.
Downloadable example: QC Excel file
From XML
The process is pretty identical than importing from Excel except that the list of option is reduced.The expected XML format is what you get when you generate a report from XStudio and choose the
(XML) Raw data report type.
Requirements
The XML format used is the same as the one used to export requirements in XML.To import requirements from XML:
- from the menu, select Tools > Import from XML
- a dialog box is displayed
- pick the Requirements option
- click on the Open button and select the file you wish to import
- the raw data area displays the content of the file
- click on Submit


After the import task has completed, the requirements immediately appear in the test tree.
Here is an example of requirement XML import file.
Specifications
The XML format used is the same as the one used to export specifications in XML.To import specifications from XML:
- from the menu, select Tools > Import from XML
- a dialog box is displayed
- pick the Specification option
- click on the Open button and select the file you wish to import
- the raw data area displays the content of the file
- click on Submit


After the import task has completed, the specifications immediately appear in the test tree.
Here is an example of specification XML import file.
Tests and test cases
The XML format used is the same as the one used to export tests and test cases in XML.To import tests and testcases from XML:
- from the menu, select Tools > Import from XML
- a dialog box is displayed
- pick the Tests option
- click on the Open button and select the file you wish to import
- the raw data area displays the content of the file
- click on Submit


After the import task has completed, the tests and testcases immediately appear in the test tree.
Here are 2 examples of test and testcase XML import file (without procedure) and test and testcase XML import file (with procedure).
Migrating existing data
The easiest way to migrate existing data to XStudio is to export you current data to Excel, re-format the Excel to match XStudio's appropriate format and import this new Excel.Depending on where are currently stored your data the method to export them in Excel will differ. Please refer to the documentation of the tool that is currently hosting the data to understand how to do so.
Example: Export some tests (including their steps) from HP ALM:
- On the ALM sidebar, select Dashboard > Analysis View
- Right-click a folder under the Private or Public root folder and select New Folder
- Right-click a folder and select New Excel Report
- In the Configuration tab, click the Query tab and click on Query Builder
- Write your SQL query here (contact HP for more information about ALM database schema). In this example, the query could be:
 SELECT
   AL.AL_DESCRIPTION As 'FOLDER',
   TS_TEST_ID As 'TEST ID',
   TS_NAME As 'TEST NAME',
   TS_DESCRIPTION As 'TEST DESCRIPTION',
   DS_STEP_NAME As 'STEP NAME',
   DS_DESCRIPTION As 'DESCRIPTION',
   DS_EXPECTED As 'EXPECTED RESULT'
 FROM TEST
   INNER JOIN DESSTEPS ON DS_TEST_ID = TS_TEST_ID
   INNER JOIN ALL_LISTS AL ON AL_ITEM_ID = TS_SUBJECT
 ORDER
   BY FOLDER, TS_NAME, DS_STEP_ORDER ASC
- In the Configuration tab, open the Generation Settings tab and set appropriate options
- Click on the Generate button