

The test campaigns
- the total number of campaigns and campaign sessions
- the number of campaigns and campaign sessions in each category
- the number of campaigns and campaign sessions in each folder
- the status (stopped, paused, running, idle) of each campaign session (indicated by the overlay on the icon)
- the start and stop date and time of each campaign session

Once all the tests have been defined and implemented, you have to run them. To do so, you first have to gather all the tests you wish to run in a campaign. For instance, it may be of interest to define a campaign including all the tests of a specific category (or just a subset). A campaign is, by definition, just an sorted list of tests.
At this stage, you are able to run a campaign but what happens if you run a campaign several times? Of course, you want to be able to retrieve the results from each campaign run. This is where a Campaign Session comes into play.
From a campaign, you can create as many campaign sessions as you want (there is an easy "duplicate" procedure). This allows to independently archive all the results and reports from each test execution.
Progress Metrics
In order to follow the progress of the test executions, the campaigns tree includes a progress column showing at a glance the estimated progress of each campaign (session) in the tree.The progress is also consolidated at folder/root folder level.
The progress indicator provides the percentage of execution of the tests in the campaign session.
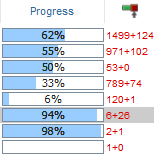
Depending on what is selected in the
 drop-down menu, the figure on the right-hand side of the progress bar will indicate:
- Test cases executed: how many test cases still need to be executed
- Time spent: an estimation of the time necessary to complete the execution
The progress of each session is calculated based on:
- the number of test cases in the session,
- the number of test cases executed in the session.

Progress aggregation
The progress of each folder or campaign is calculated by aggregation, based on the progress of its underlying entities.For instance, the progress of a campaign will be calculated using the formula:

Quality Metrics
In order to have a quantifiable follow-up of the quality, the campaigns tree includes a coverage column showing at a glance the estimated quality of each campaign (and session) in the tree.The quality is also consolidated at folder/root folder level.
The quality indicator provides an estimated percentage of success of the latest tests executions functionally covering the SUT. The figure on the right-hand side of the quality progress bar indicates how many links are linking the SUT to its successful/total test cases. If the SUT is linked several times to the same test/test case through different paths, they are counted as different links.
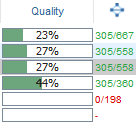
For each node of the corresponding trees (folders), quality will be calculated taking into account the share of successful related tests.
The quality indicator will be an integer with possible values ranging from 0 to 100.
- 0% value means no test linked to the current object is successful.
- 100% value means that coverage is optimal and all linked tests are successful.
The generic quality formula for a session is:

Quality aggregation
For each folder or campaign the quality is calculated by aggregation, based on the quality of its underlying objects.For instance, the quality of a campaign will be calculated using the formula:

Searching
For more details, refer to the Searching object chapter.The root node
Tabs
Results
- Progress
- History
- Tree view
- Tests
- Test cases
- Steps
- Per session
- Per configuration
- Per agent
- per operator
To get the results:
- switch to the Campaigns module on the side bar
- in the tree, select the Root folder
- on the right panel, select the Results tab
- seven tabs Progress, Tree View, Tests, Test cases, Steps, Per session, Per configuration, Per agent and Per operator are displayed. Each shows some useful pieces of information:
Progress
To get progress tests results:- switch to the Campaign module on the side bar
- select the Root folder in the tree
- on the right panel, select the Results tab
- select the Progress tab
- set the Start date and End date and the SUT
- for Tests, select the Tests tab to display the tests progress
- for Tests cases, select the Tests cases tab to display the progress of the tests cases


History
To get the history of ALL the results obtained on all the sessions:- switch to the Campaign module on the side bar
- select the Root folder in the tree
- on the right panel, select the Results tab
- select the History tab

The first stack chart displays all the sessions in a timeline and for each session a breakout of the results.
The second stack chart displays a similar graphic where the results are shown per date rather than session.
Of course, as for all the line charts, bar charts or stack charts in XStudio, you can zoom in and out.
The two following pie charts show a result breakout out of ALL the results obtained in all the sessions.
Tree view
To get tree view tests results:- switch to the Campaign module on the side bar
- select the Root folder in the tree
- on the right panel, select the Results tab
- select the Tree View tab to display the tree wiew of the tests

Tests
To get tests results:- switch to the Campaign module on the side bar
- select the Root folder in the tree
- on the right panel, select the Results tab
- select the Tests tab to display the results of the tests

In the Tests tab, we can reorder the columns, resize them, sort on the columns content, add some optional columns, create some filters and export the table to Excel.
For more details, refer to the SUT toolbar results chapter.
Test cases
To get test cases results:- switch to the Campaign module on the side bar
- select the Root folder in the tree
- on the right panel, select the Results tab
- select the Test cases tab to display the results of the test cases

In the Test cases tab, we can reorder the columns, resize them, sort on the columns content, add some optional columns, create some filters and export the table to Excel.
For more details, refer to the SUT toolbar results chapter.
Steps
To get steps results:- switch to the Campaign module on the side bar
- select the Root folder in the tree
- on the right panel, select the Results tab
- select the Steps tab to display the results of the steps.

In the Steps tab, we can reorder the columns, resize them, sort on the columns content, add some optional columns and export the table to Excel.
For more details, refer to the SUT toolbar results chapter.
Per session
To get the per session results:- switch to the Campaign module on the side bar
- select the root folder in the tree
- on the right panel, select the Results tab
- select the Per session tab to display the results per session.

Per configuration
To get the per configuration results:- switch to the Campaign module on the side bar
- select the Root folder in the tree
- on the right panel, select the Results tab
- select the Per configuration tab to display the results per configuration.

Per agent
To get the Per agent results:- switch to the Campaign module on the side bar
- select the Root folder in the tree
- on the right panel, select the Results tab
- select the Per agent tab to display the results per agent.

Per operator
To get the Per operator results:- switch to the Campaign module on the side bar
- select the Root folder in the tree
- on the right panel, select the Results tab
- select the Per operator tab to display the results per operator.

Toolbar
Create a folder
A folder can be created only under the root node or another folder node.Here is the process to create a new folder:
- select a root node in the tree
- on the right -hand side panel, click on the create a folder button

- enter the name of the folder and submit
- the folder immediately appears in the tree
The folder nodes
Tabs
Details
The folder details tab allows one to specify the name of the folder
Results
- Progress
- History
- Tree view
- Tests
- Test cases
- Steps
- Per session
- Per configuration
- Per agent
- per operator
To get the folder results:
- switch to the Campaigns module on the side bar
- in the tree, select the Campaign folder
- on the right panel, select the Results tab
- seven tabs Progress, Tree View, Tests, Test cases, Steps, Per sesion, Per configuration, Per agent and Per operator are displayed. Each shows some useful pieces of information:
Progress
To get progress tests results:- switch to the Campaign module on the side bar
- select the Campaign folder in the tree
- on the right panel, select the Results tab
- select the Progress tab
- set the Start date and End date and the SUT
- for Tests, select the Tests tab to display the tests progress
- for Tests cases, select the Tests cases tab to display the progress of the tests cases


History
To get the history of ALL the results obtained in the sessions underneath this folder:- switch to the Campaign module on the side bar
- select the Campaign folder in the tree
- on the right panel, select the Results tab
- select the History tab

The first stack chart displays all the sessions underneath this folder in a timeline and for each session a breakout of the results.
The second stack chart displays a similar graphic where the results are shown per date rather than session.
Of course, as for all the line charts, bar charts or stack charts in XStudio, you can zoom in and out.
The two following pie charts show a result breakout out of ALL the results obtained in the sessions underneath this folder.
Tree view
To get tree view tests results:- switch to the Campaign module on the side bar
- select the campaign folder in the tree
- on the right panel, select the Results tab
- select the Tree View tab to display the tree wiew of the tests

Tests
To get tests results:- switch to the Campaign module on the side bar
- select the Campaign folder in the tree
- on the right panel, select the Results tab
- select the Tests tab to display the results of the tests

In the Tests tab, we can reorder the columns, resize them, sort on the columns content, add some optional columns, create some filters and export the table to Excel.
For more details, refer to the SUT toolbar results chapter.
Test cases
To get test cases results:- switch to the Campaign module on the side bar
- select the Campaign folder in the tree
- on the right panel, select the Results tab
- select the Test cases tab to display the results of the test cases

In the Test cases tab, we can reorder the columns, resize them, sort on the columns content, add some optional columns, create some filters and export the table to Excel.
For more details, refer to the SUT toolbar results chapter.
Steps
To get steps results:- switch to the Campaign module on the side bar
- select the Campaign folder in the tree
- on the right panel, select the Results tab
- select the Steps tab to display the results of the steps.

In the Steps tab, we can reorder the columns, resize them, sort on the columns content, add some optional columns and export the table to Excel.
For more details, refer to the SUT toolbar results chapter.
Per session
To get the per session results:- switch to the Campaign module on the side bar
- select the Campaign folder in the tree
- on the right panel, select the Results tab
- select the Per session tab to display the results per session.

Per configuration
To get the per configuration results:- switch to the Campaign module on the side bar
- select the Campaign folder in the tree
- on the right panel, select the Results tab
- select the Per configuration tab to display the results per configuration.

Per agent
To get the Per agent results:- switch to the Campaign module on the side bar
- select the Campaign folder in the tree
- on the right panel, select the Results tab
- select the Per agent tab to display the results per agent.

Per operator
To get the Per operator results:- switch to the Campaign module on the side bar
- select the Campaign folder in the tree
- on the right panel, select the Results tab
- select the Per operator tab to display the results per operator.

Attachments
For more details, refer to the Attachment chapter.Exploratory Stats
The Exploratory Stats tab will display some metrics based on all the exploratory sessions included in the current folder and its childs:- A Time spent breakout bar chart showing the time spent distribution on each exploratory session
- A Average time spent breakout pie chart showing where is time spent in average
- A Bug# per session breakout pie chart showing where is time spent in average
- A Bug# per tester breakout bar chart showing the number of bugs reported in each exploratory session
- A Session# per SUT breakout pie chart showing the number of exploratory sessions executed on each SUT
- A Session# per priority breakout pie chart showing the number of exploratory sessions per priority
- A Session# per tester breakout pie chart showing the number of exploratory sessions per tester

Toolbar
Create a folder
A folder can be created under another folder node.Here is the process to create a new folder:
- select a folder node in the tree
- on the right panel, click on the Create folder button
- enter the name of the folder and submit
- the folder immediately appears in the tree
Delete a folder
You can delete a folder by just clicking this button
WARNING: deleting a folder will delete all objects linked to this folder (i.e. underlying folders and campaigns, sessions etc.)
Empty a folder
You can empty a folder by just clicking this button
WARNING: emptying a folder will delete all objects linked to its childs (i.e. underlying folders and campaigns, sessions etc.)
Move a folder
You can move a folder by just clicking this buttonCreate a campaign
A campaign can be created only under a folder node.Here is the process to create a new campaign:
- in the tree, select a folder (create one if necessary)
- on the right panel, click on the create campaign button

- a dialog box including two tabs is displayed
- fill in the Details tab with the name of the campaign
- in the Content tab, select all the tests you want to be part of this campaign
- click on submit
- the campaign immediately appears in the tree


As we've just seen, creating a new campaign consists essentially in selecting the tests we want to have in this campaign.
To select the tests to be included in this campaign, just un-toggle the tree filter
TIP: If you have to select hundreds of tests this task can be painful and error prone though.
Hopefully, the filtering toolbar at the top of the tree can help you selecting more intelligently the tests.
For more details, refer to the Filtering chapter.
Hopefully, the filtering toolbar at the top of the tree can help you selecting more intelligently the tests.
For more details, refer to the Filtering chapter.
Create a Kalistick/Coverity Test Advisor campaign
If you have integrated XStudio with Kalistick/Coverity Test Advisor, you will be able to automatically build your non-regression campaign.To create a campaign from Kalistick/Coverity Test Advisor data:
- in the tree, select a folder
- on the right panel, click on the Create Kalistick campaign button

- select the file generated by Kalistick/Coverity Test Advisor
- click on submit
- the campaign immediately appears in the tree
Create an exploratory session
The exploratory session can be created only under a folder node. The process to create a new exploratory session is as follows :- in the tree, select a folder (create one if necessary)
- on the right panel, click on the Created Exploratory Session button

- a dialog box including tree tabs is displayed:
- fill in the Details tab with the name of the session, select priority, fill in the carter panel
- in the Tester tab, select the name of the tester performing the session
- in the SUT tab, select the SUT (suit under the test)
- click on submit
- the exploratory session immediately appears in the tree


The campaigns nodes
Tabs
Details
The campaign Details tab allows one to specify the name and the description of the campaign.
!!
Content
The campaign Content tab allows selecting of all the tests you want to be part of the campaign.
Order
The campaign Order tab allows one to sort all the tests either manually or using dependencies or priorities.Here is how to sort the tests :
- in the tree, select the campaign
- on the right panel, select the Order tab
- select one or several tests in the list and use the move buttons


 to position the test(s) wherever you want in the list
 - click on submit

Results
- Progress
- History
- Tree View
- Requirements
- Specifications
- Tests
- Test cases
- Steps
- Per session
- Per configuration
- Per agent
- per operator
To get campaign results:
- switch to the Campaigns module on the side bar
- in the tree, select the campaign folder
- on the right panel, select the results tab
- ten tabs Progress, Tree View, Requirements, Specifications (if enabled), Tests, Test cases, Steps, Per session, Per configuration, Per agent and Per operator are displayed. Each shows some useful pieces of information:
Progress
To get progress tests results:- switch to the Campaign module on the side bar
- select the Campaign in the tree
- on the right panel, select the Results tab
- select the Progress tab to display progress of the tests

History
To get the history of ALL the results obtained from this campaign:- switch to the Campaign module on the side bar
- select the Campaign in the tree
- on the right panel, select the Results tab
- select the History tab

The first stack chart displays all the sessions underneath this campaign in a timeline and for each session a breakout of the results.
The second stack chart displays a similar graphic where the results are shown per date rather than session.
Of course, as for all the line charts, bar charts or stack charts in XStudio, you can zoom in and out.
The two following pie charts show a result breakout out of ALL the results obtained from this campaign targeting this SUT.
Tree View
To get tree view tests results:- switch to the Campaign module on the side bar
- select the campaign folder in the tree
- select the campaign in the tree
- on the right panel, select the Results tab
- select the Tree View tab to display the tree wiew of the tests

Requirements
To get requirements results:- switch to the Campaign module on the side bar
- in the tree, select the campaign
- on the right panel, select the Results tab
- select the Requirements tab to display the results of the campaign.

Specifications
To get specifications results:- switch to the Campaign module on the side bar
- in the tree, select the campaign
- on the right panel, select the Results tab
- select the Specifications tab to display the results of the campaign.

Tests
To get tests results:- switch to the Campaign module on the side bar
- in the tree, select the campaign
- on the right panel, select the Results tab
- select the Tests tab to display the results of the campaign.

In the Tests tab, we can reorder the columns, resize them, sort on the columns content, add some optional columns, create some filters and export the table to Excel.
For more details, refer to the SUT toolbar results chapter.
Test cases
To get test cases results:- switch to the Campaign module on the side bar
- in the tree, select the campaign
- on the right panel, select the Results tab
- select the Test cases tab to display the results of the campaign.

In the Test cases tab, we can reorder the columns, resize them, sort on the columns content, add some optional columns, create some filters and export the table to Excel.
For more details, refer to the SUT toolbar results chapter.
Steps
To get steps results:- switch to the Campaign module on the side bar
- in the tree, select the campaign
- on the right panel, select the Results tab
- select the Steps tab to display the results of the campaign.

In the Steps tab, we can reorder the columns, resize them, sort on the columns content, add some optional columns and export the table to Excel.
For more details, refer to the SUT toolbar results chapter.
Per session
To get the per session results:- switch to the Campaign module on the side bar
- select the Campaign in the tree
- on the right panel, select the Results tab
- select the Per session tab to display the results per session.

Per configuration
To get the per configuration results:- switch to the Campaign module on the side bar
- select the campaign in the tree
- on the right panel, select the Results tab
- select the Per configuration tab to display the results of the campaign per configuration.

Per agent
To get results per agent:- switch to the Campaign module on the side bar
- select the campaign in the tree
- on the right panel, select the Results tab
- select the Per agent tab to display the results of the campaign per agent.

Per operator
To get results per operator:- switch to the Campaign module on the side bar
- select the campaign in the tree
- on the right panel, select the Results tab
- select the Per operator tab to display the results of the campaign per operator.

Coverage
The Coverage tab will display the coverage details of the selected campaign in terms of SUTs, requirements and specifications (if enabled).In addition, some advises are given to improve the coverage of the campaign:
To get campaigns coverage metrics:
- switch to the Campaigns module on the side bar
- in the tree, select the Campaign folder
- on the right panel, select the Coverage tab
- three tabs By SUTs, By specifications and By requirements are displayed. Each gives useful pieces of information such as:
- percentage of the coverage
- for the SUTs, the list of those covered, partially covered and not covered by the campaign.
- for the specifications, the list of those covered, partially covered and not covered by the campaign.
- for the requirements, the list of those covered, partially covered and not covered by the campaign.


Attachments
For more details, refer to the Attachment chapter.Toolbar
Delete a campaign
You can delete a campaign by just clicking this button
WARNING: deleting a campaign will delete all the items associate with it (i.e. sessions etc.)
Copy a campaign
You can copy a campaign by just clicking this buttonMove a campaign
You can move a campaign by just clicking this buttonCreate a campaign session
To create a campaign session:- in the tree, select a campaign
- on the right panel, click on the Create campaign session button

- a dialog box including twelve tabs is displayed:


- fill in the Details tab with the name of the session.
- (opt.) select the Test operator tab and pick the user who is assigned to executing the session
- select the Agent tab and
- either leave the Any agent option set (in this case, this session will be executable on any computer on the network (but at the only condition that the session is started manually from XStudio),
- pick the All the agents in the pool option and select one or several agents in the tree (in this case, the session will be executed on ALL the agents simultaneously),
- or pick the first available agent in the pool option and select one or several agents in the tree (in this case, from the time the session is started, the first agent that is available will be the only one to execute the session).
When you select an agent, you can also possibly select a number of execution threads.
In this case, each test is executed several times in parallel on the agent. - select the SUT tab and pick the SUT on which the session will be run
- select the Configuration tab and pick the configuration you wish for each category involved in this campaign session. Once a campaign session is created, it is, then, on purpose made impossible to change the associated configurations. If no configuration is available:
- click on the Create a configuration button

- a dialog box is displayed
- enter the name of the configuration
- fill in all the forms displayed and submit
- the launchers (xml and jar files) needed for this campaign session MUST be accessible in the bin/launchers folder
- click on the Create a configuration button
- (opt.) if needed, modify the dynamic attributes values in the Attributes tab
- (opt.) if needed, modify the params values in the Params tab
- (opt.) select the Assets tab and pick the assets that will be associated to the session.
This information can be used by the system to know which tests will be actually executed in this session based on the assets required by each test.
By ticking the Create one Session per asset, the system will not create 1 session but 1 session per asset.
Use this option if for example you want to create a session per environment. - (opt.) select the Monitoring agent tab and pick the monitoring agent on which the session will be run
- (opt.) select the Monitoring servers tab and pick the monitoring servers on which the session will be run
- (opt.) select the Monitoring features tab and select or create your monitoring configuration
- (opt.) select the CC Emails tab and check some users to receive a notification when the campaign session will be completed
- click on submit
- the campaign session immediately appears in the tree in idle state


Create a schedule
When certain tests are aimed at being executed completely automatically (using some specific automatic launcher), you can schedule a campaign to be executed on a regular basis. To do this, you need to create a Schedule. Then, at the appropriate time, a campaign session will be automatically generated and started by XStudio.To create a schedule:
- in the tree, select a campaign
- on the right panel, click on the Create schedule button

- a dialog box including nine tabs is displayed


- fill in the Details tab with the name and the description of the schedule
- in the Scheduling tab, select the days and time when you want the sessions to be created and executed. Don't forget to tick the Enabled check box. A disabled schedule will not generate any test execution
- (opt.) select the Test operator tab and pick the user who will (virtually) run the sessions
- select the Agent tab and
- either leave the Any agent option set (in this case, this session will be executable on any computer on the network (but at the only condition that the session is started manually from XStudio),
- pick the All the agents in the pool option and select one or several agents in the tree (in this case, the session will be executed on ALL the agents simultaneously),
- or pick the first available agent in the pool option and select one or several agents in the tree (in this case, from the time the session is started, the first agent that is available will be the only one to execute the session).
When you select an agent, you can also possibly select a number of execution threads.
In this case, each test is executed several times in parallel on the agent. - select the Monitoring agent tab and pick the agent you wish to run the sessions
- select the Monitored servers tab and pick the monitored servers on which the sessions will be run
- select the SUT tab and pick the SUT on which the sessions will be run
- select the Configuration tab and select a configuration for each category involved in this schedule. Once a schedule is created, it is on purpose made impossible to change the associated configurations. If no configuration is available, you will need to create one
- (opt.) select the CC Emails tab and tick the users you want to receive a notification when the campaign sessions are completed
- click on submit
- the schedule immediately appears in the tree


When the time comes for an agent to execute the tests, the agent will create the campaign session and then execute it. From any station hosting XStudio, after refreshing the page, the campaign session will appear under the schedule node in the tree.
Create a test plan
It may be useful to export or to print a report of all the tests belonging to a campaign.For more details, refer to the the Campaigns report chapter.
The exploratory sessions nodes
In about 10 years 'exploratory' testing became a teachable discipline. Jonathan and James Bach introduced a new 'session-based' method as the sound response to the test manager's demand of making exploratory testing more measurable and auditable. The Exploratory Session module in XStudio is based on the Session-based testing (SBT) principles.The Test manager defines some Sessions coming each with one simple charter and assign the sessions to the testers. A session is an uninterrupted block of reviewable, chartered test effort (typically 3 consecutive hours of testing). The tester will take his notes directly in XStudio's session notes sheet. When the session is completed, there is a Debriefing which is mainly a discussion between the lead and the tester. The session report is automatically generated by XStudio based on the debriefing inputs.
XStudio brings a new dimension to these generic concepts: the 100% automated conversion of the exploratory session's notes in scripted tests. For this, the tester just needs to use a limited number of keywords when he describes the experiments/tests he did: "testcase", "do", "check" and "and". We call it PDNL (Procedure Definition in Natural Language).
Tabs
Details
The exploratory session Details tab allows one to specify different elements of the session, including:- Identifier: fills out automatically with the ordinal number of sessions
- Name: shows the name of the session
- Priority : specifies High, Normal, Low level of the session priority
- Charter: shows the aim of the session (can be changed by clicking on
 )
) - Notes: allows writing testing notes in Procedure Description Natural Language. To start writing, click on the pencil icon
- Time spent: shows the total session time in seconds, minutes, hours
- Time spent (%): specifies the percentage of session time spent on setup, design/execution, reporting bugs, and time out of the session
- Start and Stop: allows to select the date and time when the session begins and ends

Tester
The exploratory session Tester tab allows assigning a tester for a session.To assign a tester:
- open the corresponding test campaign folder
- select a tester to assign
- click the Submit button

SUT
The exploratory session SUT tab shows the SUT on which the session will be run.To select a SUT:
- open the corresponding campaign folder
- select SUT
- click the Submit button
- Click on the Bug icon to see the detailed information about each bug.
- Click on the Filter icon
 to show/hide bug folders.
 - (Opt.) Click on the Bug icon
 at the top right-hand corner to display the closed bugs.
 - To show/hide the list of existing attributes, click the Filter icon

- click on the Create attribute button

- a new pop-up window appears
- Fill in the name, specify the type, dynamic or not, and normal values for the attribute.
- click on the Submit button
- The new attribute name appears in the list.
- click on the Delete attribute button

- A new pop-up window appears asking to confirm the deletion.
- click on the Submit button
- The attribute immediately disappears off the list.
- click on the Edit attribute button

- a new pop-up window appears
- fill in the name and values
- click on the Submit button
- The attribute immediately disappears from the list with new values.
- click on the Open revision button

- a new pop-up window appears, showing detailed information.
- in the tree, select the exploratory session
- on the right panel, click on the start button
 to display the "Exploratory session execution" screen
 - session is running, a dialog box including two tabs is displayed:
- Notes: you can take your notes and submit bugs from this panel
- Bugs: lists all the bugs
- switch to the Campaigns module on the side bar
- in the tree, select the Campaign session
- on the right panel, select the Results tab
- seven tabs Tree view, Statistics, Requirements, Specifications (if enabled), Tests, Test cases and Steps are displayed. Each shows useful pieces of information:
- switch to the Campaign module on the side bar
- in the tree, select the campaign session
- on the right panel, select the Results tab
- select the Tree View tab to display the results of the campaign session.
- the screen is split into three different areas:
- a test tree showing the tests included in the campaign with their results. It shows a number of useful pieces of information:
- the total number of tests that succeeded or failed
 success
 failed
 unknown
 not executed
 not executable
 - the number of tests that succeeded or failed in each category
- the number of tests that succeeded or failed in each folder
- the total number of tests that succeeded or failed
- a test case sub-tree showing the result of each test case:
success
failed
not executed
not executable
 indefinite (some tests ' i.e. performances - may just return some values that will need to be analyzed by an operator)
 - a message area showing the details of execution of a specific test case
- an attachment area including any file the launchers may have uploaded in the database at runtime
- a test tree showing the tests included in the campaign with their results. It shows a number of useful pieces of information:
- if all testcases are success then the test is set success
- else if at least one is failed then the test is set failed
- else if all testcases are not executed then the test is set not executed
- else if all testcases are not executable then the test is set not executable
- else the is set unknown
- if ignoring all the not executable testcases then the test is set success
- else if at least one is failed then the test is set failed
- else if ignoring all the not executable and all the not executed testcases then the test is set not executed
- else if all testcases are not executable then the test is set not executable
- else the test is set unknown
- click on a test
- the test case sub-tree is updated showing the associated test cases results
- click on a test case
- the messages area shows the details of each step during the test case execution
- the attachments area shows all the files attached to the test case during its execution
- switch to the Campaign module on the side bar
- in the tree, select the campaign session
- on the right panel, select the Results tab
- select the Tree View tab to display the results of the campaign session.
- select a Test tab to display the results of the test cases.
- for a test case, click on the Modify result button

- the result update pop up is displayed.
- click on the result button
- The list of test cases results is updated with new result

- switch to the Campaign module on the side bar
- in the tree, select the campaign session
- on the right panel, select the Results tab
- select the Statistics tab to display the statistics results of the campaign session.
- the Tests column gives the statistics/results based only on the tests results
- the Test cases column gives the statistics/results based only on the test cases results
- in the header tables:
- the percentage of success, failure etc of tests/test cases
- the coverage of the execution (based on the number of tests/test cases that were not executed)
- in the pie charts:
- the number of success, failure etc. of tests/test cases
- the percentage of success and failure (after removal of the unknown, indefinite or not executed tests/test cases)
- switch to the Campaign module on the side bar
- in the tree, select the campaign session
- on the right panel, select the Results tab
- select the Requirements tab to display the results of the campaign session.
- switch to the Campaign module on the side bar
- in the tree, select the campaign session
- on the right panel, select the Results tab
- select the Specifications tab to display the results of the campaign session.
- switch to the Campaign module on the side bar
- in the tree, select the campaign session
- on the right panel, select the Results tab
- select the Tests tab to display the results of the campaign session.
- switch to the Campaign module on the side bar
- in the tree, select the campaign session
- on the right panel, select the Results tab
- select the Test cases tab to display the results of the campaign session.
- switch to the Campaign module on the side bar
- in the tree, select the campaign session
- on the right panel, select the Results tab
- select the Steps tab to display the results of the campaign session.
- in the tree, select a campaign session
- on the right panel, click on the Merge campaign sessions button

- a dialog box containing two tabs is displayed


- by default, the Source campaign sessions tab is displayed
- select the sessions you want merged
- click on Destination folder tab
- select the destination folder
- click on Options tab
- select the following option: Merge all sessions in a "one-agent/one-instance" campaign session
- select the conflict resolution method. Three choices are possible:
- The most recent result is retained
- The best result is retained
- The worst result is retained
- and submit
- The merged campaign session is generated in the destination folder with one instance

- in the tree, select a campaign session
- on the right panel, click on the Merge campaign sessions button
- a dialog box contains two tabs is displayed

- by default, the Source campaign sessions tab is displayed
- select sessions you want merged
- click on Destination folder tab
- select the destination folder
- click on Options tab
- select the following option: Add as many instances as necessary in the merged campaign session...
- and submit
- The merged campaign session is generated in the destination folder with as many instances as sessions merged


- in the tree, select the Source campaign sessions
- on the right panel, click on the Generate residual tests campaign button

- a dialog box containing two tabs is displayed


- select the destination folder and options
- Click on submit
- The Residual tests campaign is generated in the destination folder
- in the tree, select a campaign session
- on the right panel, click on the start button
- the Test campaign details screen immediately appears and will display in real time the results of testing

- If the campaign includes tests to be executed manually (the tests are part of one or several categories where you choose manual.jar, simple_manual.jar, tabular_manual.jar, tabular_step_manual.jar or tree_step_manual.jar as launcher), then you will get additional dialog boxes such as:

- in the tree, select a campaign session
- on the right panel, click on the click on the start with a specific launcher button

- in this case, even if the session already has been set with some configuration, you'll need to select a launcher and a configuration corresponding to this launcher:

- Monitoring agent
- Monitored servers

Bugs
The exploratory session Bugs tab shows all the bugs that have been found on the selected exploratory session.The Bugs were found through a failed test and link to this test execution.

Attributes
The exploratory session Attributes tab allows one to see the attributes for the session.
Create an attribute
To create a new attribute:
Delete an attribute
To delete an attribute:
Edit an attribute
To edit an attribute:
Attachments
For more details, refer to the the Attachment chapter.Revisions
The exploratory session Revisions tab shows the number of session revisions as well as the date and time.
To open the Revision:

Changes
The exploratory session Changes tab tracks which changes were performed over the session.
The table displays a date of change, a user name, what type of change has been made, and additional information.
Toolbar
Deleting an exploratory session
To delete an exploratory session, just click on this buttonMoving an exploratory session
To move a test, just click on this buttonGenerating test cases
To generate test cases from the exploratory sessions included in the current folder, just click on this buttonStarting an exploratory session
To start an exploratory session:

The campaign sessions
Tabs
Details
The campaign session Details tab allows one to specify the name, the report introduction and the report conclusion.Test operator
The campaign session Test operator tab allows one to specify the user who will run the session.Agents
The campaign session Agent tab allows one to specify the agent on which the session will be run. If you wish to run the tests on the local host, leave the default selection (it should already match the local host)Monitoring
Monitored agent
The campaign session Monitoring agent tab allows one to see the agent on which the session will be run.Monitored servers
The campaign session Monitored servers tab lets one see the servers on which the session will be run.Monitored features
The campaign session Monitored features tab allows one to see the monitoring configuration.SUT
The campaign session SUT tab shows the SUT on which the session will be runResults
The Results tab will display the results details of the selected campaign session in terms of requirements, specifications (if enabled), tests/test cases and statisticsTo get campaign session results:
Tree View
To get tree view results:
NOTE: Tests results are calculated from all underlying test cases results using the following algorithme:
NOTE: By setting the new parameter "consider NOT_EXECUTABLE testcases in the progress/results/quality metrics" to False, the algorithm becomes:
NOTE: By setting the new parameter "consider NOT_EXECUTABLE testcases in the progress/results/quality metrics" to False, the algorithm becomes:
NOTE: The usual process to get all the details of an execution is the following:
Updating a results post-execution
XStudio has an ability to modify a result without having to re-run the test campaign. To do so:


Statistics
To get statistics results:
The screen is split into two columns:
Each column immediately shows a number of useful pieces of information:
Requirements
To get requirements results:
Specifications
To get specifications results:
Tests
To get tests results:
In the Tests tab, we can reorder the columns, resize them, sort on the columns content, add some optional columns, create some filters and export the table to Excel.
For more details, refer to the SUT toolbar results chapter.
Test cases
To get test cases results:
In the Test cases tab, we can reorder the columns, resize them, sort on the columns content, add some optional columns, create some filters and export the table to Excel.
For more details, refer to the SUT toolbar results chapter.
Steps
To get steps results:
In the Steps tab, we can reorder the columns, resize them, sort on the columns content, add some optional columns and export the table to Excel.
For more details, refer to the SUT toolbar results chapter.
Bugs
This tab shows all the bugs that have been found on the selected campaign session.Bugs were found through a failed test and link to this test execution.

Configuration
The campaign session Configuration tab allows one to see the configuration used for the execution.Assets
The campaign session Assets tab allows seeing the assets used for the execution.Attributes
The campaign session Attributes tab lets one see the attributes used for the execution.
Params
Attachments
For more details, refer to the Attachment chapter.CC Emails
The campaign session CC Emails tab makes sure that some specific users will be notified by email when the campaign session is completedToolbar
Delete a campaign session
You can delete a campaign session by just clicking this buttonCopy a campaign session
A campaign session can be copied just by clicking this button,Merge campaign sessions
It's possible to merge several sessions with one instance or several instances.One instance
To merge several sessions with one instance:


Several instances
To merge several sessions with several instances:


Generate residual tests campaign
It's possible to generate tests campaigns automatically from several campaign sessions based on rules defining which tests to include.For instance, it's possible to select several campaign sessions and generate a new campaign containing only the tests that have never been successful or that failed at least once in the past.
This is a very handy feature to generate campaign containing only tests at risk at the very end of a project for a final run.
To do so:


Create a report
It may be interesting to export or to print a campaign session report.For more details, refer to the Campaign sessions report chapter.
Start
To run a campaign session:
Start with a specific launcher
In some specific cases, you could prefer forcing using a different launcher to execute your session.For instance, if you have a campaign containing some automated tests, you may find interesting to execute it manually sometimes.

Pause
You can pause the test campaign session run by just clicking on this button.Stop
You can stop the test campaign session run by just clicking on this button.Campaign session details
You can view the test campaign session details by just clicking on this button
The campaign schedules
Tabs
Details
The campaign schedule Details tab allows one to specify the name and the description of the schedule.Scheduling
The campaign schedule Scheduling tab allows one to enable the schedule and set the date of scheduling.
Operator
The campaign schedule Operator tab allows one to specify the user who will run the schedule.Agents
The campaign schedule Agent tab allows one to specify the agent on which the schedule will be run.If you wish to run the tests on the local host, leave the default selection (that should already match the local host).
WARNING: Schedules are executed only by XAgents!
If you're running XStudio locally and want to execute a campaign overnight for exemple, you'll need to start XAgent before leaving the office.
XStudio does NOT pool for schedule's jobs to be executed.
If you're running XStudio locally and want to execute a campaign overnight for exemple, you'll need to start XAgent before leaving the office.
XStudio does NOT pool for schedule's jobs to be executed.