

Settings
Preferences can be set at server level but can also be overloaded by each user's preferences.
That's what this schema is showing:
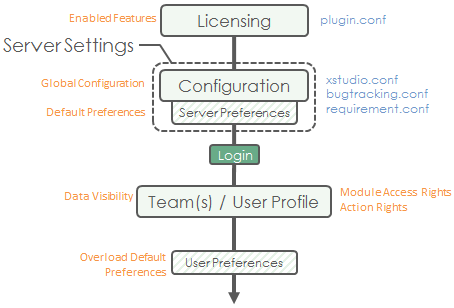
Server Settings
All XStudio's server settings can be set through the Settings > Server Settings menu.This section contains all the global settings that apply to the server. For instance, it includes the parameters defining how to connect to the database.
This is also where you specify how to connect to third-party bug-tracking systems (Generic, JIRA, Mantis, Bugzilla, Trac, Clearquest, VersionOne, Redmine or QC)
or requirement management systems (Generic, JIRA or VersionOne).
Database
The following settings are used to define the connection details to the database server.| Field | Description |
| Database server type | This indicates which database server you're using:
|
| Driver jar path | This indicates where XStudio can find the JDBC driver to connect to the database.
This field must indicates the relative path from <Install_folder>\\bin\\jdbc folder to the jar file.
|
| Driver class path | Classpath to instantiate the driver from the JAR file.
|
| Database server | This indicates the IP address or the name of the database server. |
| Database name | The name of the database (i.e. xstudio_db) |
| Connection template | Connection template to use the JDBC driver. WARNING: do NOT replace database_server and database_name fields in the connection template. They will be automatically replaced by the system with what you specified in database server and database name fields. For instance:
|
| Username | Username to connect to the database (i.e. xstudio) |
| Password | Password corresponding to the user account (i.e. xstudiopwd) |
| Accept ANY TLS/SSL certificate | If you connect to your Database server using a TLS/SSL connection and you trust the network, just check this checkbox to accept any certificate. Note that if you do so and if your environment is not safe, you're subject to a man-in-the-middle attack. For more information on this, check the Secure connections chapter. |
| Certificate (needed only with TLS/SSL enabled) | If you connect to your Database server using a TLS/SSL connection, you'll need to copy here the server's certificate. For more information on this, check the Secure connections chapter. |
| Max number of connections (default 64) |
This defines how many connections can be opened by each client. Usually, this never exceeds 10. For instance: 64 |
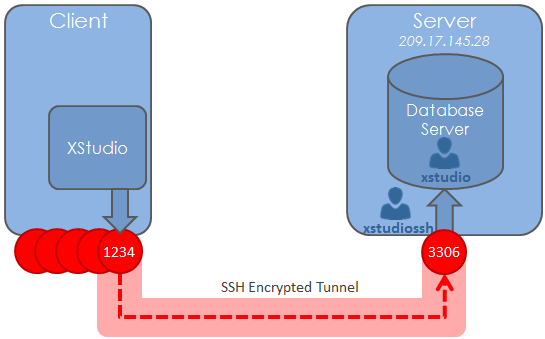
| SSH tunneling (secure connection) | If you want to use an ssh tunnel to connect to the database server. This will establish a SSH tunnel with the database server and forward all messages through this secure/encrypted transport media. |
| Username | SSH Username to connect to the remote server (i.e. sshuser) |
| Password | SSH Password corresponding to the SSH user account (i.e. sshuserpasswd) |
| Source port | The source port on local computer that will be tunneled to the destination port on the database server. This can be any arbitrary port and must be included in the Connection template setting. Usually we set this port to 1234.
|
| Destination port | The destination port on the remote computer that is hosting the database server. This port must match the port your database server is listening to (i.e. 3306 if you're using MySql with its default configuration). |
| REST API base url | This indicates the bae URL pointing to the REST API (i.e. http://<server>/xqual/api) |
| REST API default username | Default username to connect to the REST API. Each user can provide its own username/password in its user preferences though. |
| REST API default password | Default password to connect to the REST API. Each user can provide its own username/password in its user preferences though. |
IMPORTANT: SQLServer database support is only included in XStudio Business and XStudio Enterprise. You will need to have your license key registered or the system won't let you continue.
IMPORTANT: Oracle database support is only included in XStudio Enterprise. You will need to have your license key registered or the system won't let you continue.
SSH Tunneling
Let's take this example configuration: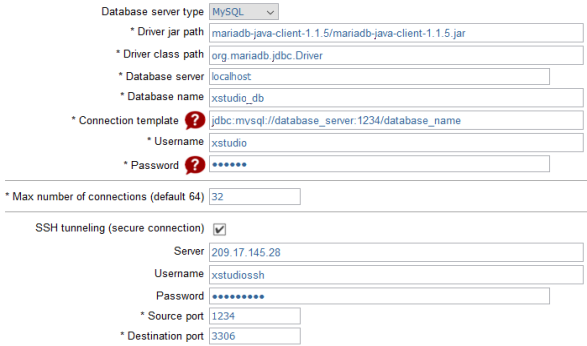
This means that all the clients will connect to the database server using localhost:1234 port and they will be automatically forwarded to 209.17.145.28:3306.
Notifications
The following settings are used by the system to send email notifications.| Field | Description |
| SMTP host | SMTP host that XStudio will use to send emails. Use the same as you normally use. |
| SMTP port | SMTP port that XStudio will use to send emails. |
| SMTP username (only if auth. required) | Optional, if your SMTP server requires authentication. Username to authenticate to the server. |
| SMTP password (only if auth. required) | Optional, if your SMTP server requires authentication. Password to authenticate to the server. |
| SMTP from address | Email address that XStudio will use to send emails. |
| smtp secure connection | Defines which security scheme is used to connect to the SMTP server. 3 choices are available:
|
| Send additional notification per failed test case | Check this is you want to receive an email each time a test is failing. |
| Send bug notification only on status change | By default, if you're assigned or the reporter of a bug, you receive a notification for any change occurring on this bug. By checking this, you'll receive a notification only when the status of the bug is modified. |
| Certificate (needed only with secure connection) | If you connect to your SMTP server using a SSL or TLS connection, you'll need to copy here the server's certificate. For more information on this, check the Secure connections chapter. |
TIP: Custom notification emails
In XStudio, you can customize the content of defects notification emails.
To do so, you must edit the following ".xslt" files located in
In XStudio, you can customize the content of defects notification emails.
To do so, you must edit the following ".xslt" files located in
<XStudio install directory>/export/xsl/" folder:
email_defect_created.xslt: Notification email after a bug is createdemail_defect_modified.xslt: Notification email after a bug is modifiedemail_defect_reminder.xslt: Notification email as a bug reminderemail_session_completed.xslt: Notification email after a session has been executedemail_testcase_failed.xslt: Notification email when a test case just failed
LDAP/Active Directory
The following settings are used by the system to register users in the central dictionary in XStudio and to authenticate them directly on the dictionary server.| Field | Description |
| LDAP Enabled | Enabled LDAP connector so that you can register LDAP users in XStudio. |
| Server URL | URL of the LDAP server. It can be an OpenLDAP, Active Directory, OpenId or any LDAP compliant server. For instance: ldap://192.168.100.116:389If you're connecting to a secure LDAP server the url will look like: ldaps://192.168.100.116:636 |
| Root path | The root path corresponds to the domain you want to search/register LDAP users from. For instance: dc=example,dc=com |
| User filter | LDAP standard filter to retrieve only users from the server. For instance: (objectClass=inetOrgPerson) (i.e. OpenLDAP example) |
| User name attribute | Name of the attribute containing the user's name in the LDAP server. For instance: cn |
| User email attribute | Name of the attribute containing the user's email in the LDAP server. For instance: mail |
| Connection username (only if auth. required) | Username to connect to the database and retrieve the list of LDAP users in the dictionary. For instance: cn=admin,dc=example,dc=com |
| Connection password (only if auth. required) | Username to connect to the database and retrieve the list of LDAP users in the dictionary. For instance: admin_pwd |
| Follow referal | If you wish the LDAP server follows referral when retrieveing the list of the users |
| Certificate (needed only with ldaps URL) | If you connect to your LDAP server using a SSL connection (ldaps:// url), you'll need to copy here the server's certificate. For more information on this, check the Secure connections chapter. |
SNMP
The following settings are used by the system to monitor resources on the network during testing.
IMPORTANT: This is useful only if you're using XStudio Enterprise as this is the only version supporting the SNMP monitoring.
| Field | Description |
| SNMP community name | Provide here the SNMP community your devices are registered to. |
| SNMP protocol version | This defines the version of the SNMP protocol supported by your network. By default, this is Version 1 |
Risk Analysis
The following settings are used to customize the way the system will calculate the risk based on the answer the user will give during the risk analysis wizard.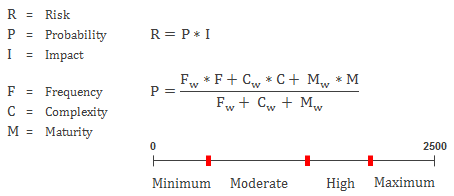
| Field | Description |
| Fw (Frequency Weight) (1-10) - default=2 | This weight defines how much you give importance to the Frequency criterion in the calculation. |
| Cw (Complexity Weight) (1-10) - default=4 | This weight defines how much you give importance to the Complexity criterion in the calculation. |
| Mw (Maturity Weight) (1-10) - default=1 | This weight defines how much you give importance to the Maturity criterion in the calculation. |
| Limit value for Maximum risk (100-2500) - default=2000 | This limit defines the minimum score obtained to have the system set the risk as Maximum. |
| Limit value for High risk (100-2500) - default=1400 | This limit defines the minimum score obtained to have the system set the risk as High. |
| Limit value for Moderate risk (100-2500) - default=600 | This limit defines the minimum score obtained to have the system set the risk as Moderate. |
Visuals
The following settings are used to customize the visuals of the application. You can use your own logo in different places so that the application respects your visual identity.| Field | Description |
| Company splashscreen | The splashscreen is the image you can see immediately when you start XStudio until you get the log in page. You can provide your own image ( .jpg, .png, .gif) of any size in the visuals folder on the server (usually in /var/lib/tomcat8/webapps/xqual/visuals). |
| Company report logo (only starting with XStudio Business) | The report logo is the image you can see in the header of all the paper reports you generate from XStudio. Provide here the name of an image you copied in the visuals folder on the server (usually in /var/lib/tomcat8/webapps/xqual/visuals).
Leave it empty if you don't want to customize the logo in the report. |
| Company icon (only starting with XStudio Business) | The company icon is the icon you can see in the left corner of the application and in the quick launcher bar. Provide here the name of a .ico you copied in the visuals folder on the server (usually in /var/lib/tomcat8/webapps/xqual/visuals).
Leave it empty if you don't want to customize the logo in the report. |
| Application title (only starting with XStudio Business) | The text in the application title bar can also be customized. Please provide here the text you want to see there. |
| Docx report header (only starting with XStudio Business) | The text in the header of the generated .docx reports can be customized. Please provide here the text you want to see in your .docx report's header. |
Attachments
The following settings are used to configure where you want the attachments and images stored.| Field | Description |
| Attachment storage type | The attachments (incl. screen captures) can be stored either in the database itself or on a Windows sharing file system. 2 choices are available:
|
| Test execution attachments max size (in bytes) | You can set a maximum size for the files generated at execution time. For no limit, set the value 0. |
| Standard item attachments max size (in bytes) | You can set a maximum size for the files users are attaching through XStudio's GUI. For no limit, set the value 0. |
| Attachments file system path | You can provide here a SMB path that looks like smb://<server>/<share>. |
| Username | The username to access the shared folder. |
| Password | The password to access the shared folder. |
Miscellaneous
The following settings are used to modify miscellaneous parameters that will affect the system or its GUI.| Field | Description |
| XHTML compliance verification of rich texts (necessary for .docx reports) | When editing some text in the rich-text widgets, a user can make some errors. Checking this option will enabled some automatic verification of all the rich-texts as they are being submitted. This is pretty important to activate this option especially if you intend to generate .docx reports at some point.
Indeed, the .docx generator is very strict and requires some strict XHTML formatted input. |
| Spell checker | Select this option if you want to use the integrated spell checker in your rich-text boxes. If this option is activated, if you make a typo while editing some text the faulty section of text will be highlighted and some suggestions will be prompted. |
| Submit button always in the first position in control bar | Select this option if you want to always have the Submit button first. |
| Test procedure autocompletion (perf. impact) | When editing test case procedures, you can benefit from an auto-completion helper that will display suggestions based on the already existing procedures in the database. This option may be time consuming in terms of startup time if you have already loaded the database with thousands of test cases. |
| Defect submission during manual testing | If this option is checked, you will be able to submit bugs while you're executing your manual tests. |
| Not implemented testcase notification |
If this option is activated and if you execute a session including tests that are not ready to be executed, they will be nicely skipped and you will be notified about it at the end of the session. Tests not ready to be executed are:
|
| Test case set as ready for manual run by default | If this option is checked, when you create a new test case, it will be by default set as 'Ready for manual run'. |
| Test case set as ready for automated run by default | If this option is checked, when you create a new test case, it will be by default set as 'Ready for automated run'. |
Advanced
The following settings are used by the system to change some very specific parameters. This section is reserved to experts only.| Field | Description |
| Include specifications in life-cycle | You can disable the Specification tree if you wish. In this case the specification management module will not appear on the sidebar and the requirements will be linked directly to the tests. |
| Timeout Keep-alive application (in s) | The system can send regularly some keep-alive messages to the server to prevent the session to be closed. This parameter defines how often they are sent. |
| Timeout Keep-alive third-party bug-tracking (in s) | The system can send regularly some keep-alive messages to the third-party bug-tracking system to prevent the session to be closed. This parameter defines how often they are sent. |
| Timeout Keep-alive third-party requirement (in s) | The system can send regularly some keep-alive messages to the third-party requirement management system to prevent the session to be closed. This parameter defines how often they are sent. |
| Timeout background statistics consolidation minimum delay (in s) | The system will regularly check the database to consolidate some statistics (bugs history and design/implementation of the test cases). This task is preferably performed when the user had not used the system for a significant amount of time (to avoid perturbing his work) and only a few times a day max. This parameter defines how often this task is executed (if the currently logged in user never uses the system). |
| Timeout background statistics consolidation no-activity delay (in s) | This parameter defines how long the system must not be used by the user to become eligible for running the consolidation background task. |
| Refresh rate real-time progress details screen (in ms) | This parameter defines how often the real-time progress details screen is refreshed. The smaller it is the most costly it is in terms of network usage. |
| Offline mode (if the clients do not have an internet access) |
By default, each time you start XStudio, the client checks on internet is a new version is available and retrieves a few configuration parameters (necessary only if you're using the community edition). If a new version of XStudio is available and you're part of the Administrators team, you'll be notified about that in a popup. However, if the client does not have an internet connexion - and depending on the OS and other criteria - the internet connexion attempt may be very long (can be up to 1 minute). To avoid that, you can just enable this parameter so that the application does not try to connect. |
| Ignore Not Executable (NA) results in Progress and Quality metrics | Tests set as Not Executable may be interesting to track or not depending on the context. This parameter defines if you want to include them in the progress and quality metrics. |
| Not Executable (NA) results are significant in History metrics | Tests set as Not Executable may be interesting to track in the history or not depending on the context. This parameter defines if you want to include them in the history and quality metrics. |
| Check requirement server settings before user preferences are applied | If you check this option, each time you start XStudio, the client will check the connection with the third-party requirement management system even before the user is actually logged in (so its user-preferences overriding the server settings). |
| Check bug-tracking server settings before user preferences are applied | If you check this option, each time you start XStudio, the client will check the connection with the third-party bug-tracking system even before the user is actually logged in (so its user-preferences overriding the server settings). |
| Linking a requirement to a SUT sets the SUT's coverage to 100% | If you check this option, each time you will link a requirement to an SUT, the SUT will be set as covered at 100% (automatically). |
| Linking a test or a specification to a requirement sets the requirement's coverage to 100% | If you check this option, each time you will link a test or a specification to a requirement, the requirement will be set as covered at 100% (automatically). |
| Linking a test to a specification sets the specification's coverage to 100% | If you check this option, each time you will link a test to a specification, the specification will be set as covered at 100% (automatically). |
| Session export for scripting |
You can enable the batch export session for scripting feature.
When enabled, a new button will appear in the campaign session toolbar.
When you will click on this button, a campaign session XML report is automatically generated in the Session export destination folder and (optionally) processed by the custom script located in Session export script path. |
| Session export destination folder |
See Session export for scripting.
|
| Session export script path |
See Session export for scripting.
|
| Manual session re-run authorized | By default, automated campaigns cannot be re-executed (to ensure fully traceable/historized records) and manual campaigns can be re-executed (because they may be time-consuming to run and may requires several days to complete). However, this setting allows forbidding re-run of manual campaigns as well.. |
| Comments are mandatory with manual testing | By default, testers executing manual tests are allowed to enter a comment for each steps, but they are not forced to do so. In some compliance driven testing, the 'comment' may in fact need to gather the actual results, which becomes manadatory for some context (such as health science and transport industries). When checked, this setting will force testers to enter some data into the comment field. This aplies to all manual test execution. |
| Comments template | If testers are forced to enter a comment (see prior setting), one can assit them by proposing a default template to use for the comment. By defualt this is empty.. |
Connectors
Requirements
- Integrated requirements
- Generic requirements
- JIRA (XML-RPC) requirements management
- JIRA (REST) requirements management
- VersionOne requirements management
Integrated requirements
This setting allows using XStudio's integrated requirement management module. The integrated requirement database will be used.| Field | Description |
| requirement system | Integrated |
Generic requirements
This setting allows interfacing with a generic third-party requirement management system. Specifications or Tests are linked to a virtual external identifier.| Field | Description |
| requirement system | Generic |
JIRA (XML-RPC) requirements management
This setting allows interfacing with a third-party JIRA issue management system using XML-RPC.Detailed information are available in the install documentation about how to setup a connection with JIRA (XML-RPC) issue management system.
JIRA (REST) requirements management
This setting allows interfacing with a third-party JIRA issue management system using REST.Detailed information are available in the install documentation about how to setup a connection with JIRA (REST) issue management system.
VersionOne requirements management
This setting allows interfacing with a third-party VersionOne.Detailed information are available in the install documentation about how to setup a connection with VersionOne.
Bug-tracking
- Integrated bug-tracking
- Generic bug-tracking
- JIRA (XML-RPC) bug-tracking
- JIRA (REST) bug-tracking
- Mantis (SQL) bug-tracking
- Mantis (SOAP) bug-tracking
- Bugzilla (SQL) bug-tracking
- Bugzilla (XML-RPC) bug-tracking
- Trac bug-tracking
- Clearquest bug-tracking
- VersionOne bug-tracking
- Redmine bug-tracking
- QC bug-tracking
Integrated bug-tracking
This setting allows using XStudio's integrated bug-tracking management module. The integrated bug database will be used.| Field | Description |
| bug-tracking system | Integrated |
Generic bug-tracking
This setting allows interfacing with a generic third-party bug-tracking system. Failed tests are linked to a virtual external identifier.| Field | Description |
| bug-tracking system | Generic |
Mantis (SQL) bug-tracking
This setting allows interfacing with a third-party Mantis bug-tracking management system using SQL.Detailed information is available in the installed documentation about how to setup a connection with Mantis (SQL) Bug-tracking server.
Mantis (SOAP) bug-tracking
This setting allows interfacing with a third-party Mantis bug-tracking management system using SOAP.Detailed information is available in the installed documentation about how to setup a connection with Mantis (SOAP) Bug-tracking server.
Bugzilla (SQL) bug-tracking
This setting enables interfacing with a third-party Bugzilla bug-tracking management system using SQL.Detailed information is available in the installed documentation about how to setup a connection with Bugzilla (SQL) Bug-tracking server.
Bugzilla (XML-RPC) bug-tracking
This setting enables interfacing with a third-party Bugzilla bug-tracking management system using XML-RPC.Detailed information is available in the installed documentation about how to setup a connection with Bugzilla (XML-RPC) Bug-tracking server.
Trac bug-tracking
This setting enables interfacing with a third-party trac issue management system.Detailed information is available in the installed documentation about how to setup a connection with trac Bug-tracking server.
JIRA (XML-RPC) bug-tracking
This setting allows interfacing with a third-party JIRA issue management system using XML-RPC.Detailed information is available in the installed documentation about how to setup a connection with JIRA (XML-RPC) issue management system.
JIRA (REST) bug-tracking
This setting allows interfacing with a third-party JIRA issue management system using REST.Detailed information is available in the installed documentation about how to setup a connection with JIRA (REST) issue management system.
Clearquest bug-tracking
This setting allows interfacing with a third-party Clearquest ALM system.Detailed information is available in the installed documentation about how to setup a connection with Clearquest ALM system.
VersionOne bug-tracking
This setting enables interfacing with a third-party VersionOne system.Detailed information is available in the installed documentation about how to setup a connection with VersionOne.
QC bug-tracking
This setting enables interfacing with a third-party QC system.Detailed information is available in the installed documentation about how to setup a connection with QC.
Redmine bug-tracking
This setting enables interfacing with a third-party Redmine system.Detailed information is available in the installed documentation about how to setup a connection with Redmine.
Coverity/Kalistick
With this plugin you will be able to trace your test activities in Kalistick and automatically import the non-regression campaigns to re-execute. The following settings will define how to interface with Kalistick (if relevant).| Field | Description |
| Kalistick/Coverity Test Advisor integration | This parameter determines if we activate the connector or not. |
| Kalistick/Coverity Test Advisor url start | This indicates the URL to inform Kalistick that a new test is about to start. For instance: http://192.168.10.230:9096/api/tce/start?code=test_id&label=test_name
|
| Kalistick/Coverity Test Advisor url stop | This indicates the URL to inform Kalistick that a new test is finished. For instance: http://192.168.10.230:9096/api/tce/stop?uuid=kalistick_id&successful=test_status&statusInfo=status_info
|
| Kalistick/Coverity Test Advisor url add cookie | This indicates the URL to add a cookie in the browser. For instance: http://192.168.10.230:9096/api/tce/addCookie?uuid=kalistick_id
|
You can also get more information on how to import Kalistick campaign
Server Preferences
The following settings are used to customize the default preferences for all the users. These settings are overriden by each user's preferences if they are provided.GUI
| Field | Description |
| Max number of selected nodes automatically expanded (large = perf. impact) |
When some tree show selected items, the system expand automatically the tree and show only the selected items. If this tree is very large (several hundreds or thousands of items selected), the expand task can be time-consuming and you may prefer getting the tree not expanded by default. This parameter will determine this limit. |
| Max age (in days) of completed items in the dashboard (0 = show only active items) |
The dashboard displays all the tasks you're supposed to work on. It also keeps the finished tasks for some time as it could be useful to check the last tasks you were working on. Of course, in this case, the progress bar is indicating 100%. This parameter defines the number of days the tasks will be kept in the dashboard after the task has been completed. If you set it to 0, the task will disappear immediately from the dashboard when it's finished. |
| Max items in auto-generated results tables (large = perf. impact) |
The philosophy behind XStudio is to show as much metrics and statistics as possible so that the user does not have to generate them manually or go through complicated wizards. However, some of those metrics takes time to be generated so you may want to disable some to optimize your user experience. This parameters will define the limit (in terms of number of data to treat) above which the metrics will be obtainable only on-demand. |
| Default test case procedure editor (Grid available only starting with XStudio Professional) |
The parameter will determine which editor to use by default to design your test cases.
2 choices are available:
|
| Rich text in test case procedure (only starting with XStudio Professional | This parameter will determine if you can use rich-text in your test case steps and expected results. |
| Grid editor auto-wrap text (only starting with XStudio Professional) |
If you select this option, the text will auto-wrap when your typing it in a test case procedure. If not, then the text will continue to grow until the next carriage return/line feed. |
| Show ids in trees | If this option is selected, most of the objects in the trees will have their names prefixed with their Ids. |
| Show real-time progress details window during test execution |
By default, when you start a campaign session, a window containing the real-time progress details of the execution is displayed. This window can bother some people and you may prefer just disabling it using this parameter. |
| Automatically close real-time progress details window after test execution |
By default, when you start a campaign session, a window containing the real-time progress details of the execution is displayed. At the end af the execution, this windows remains disdplayed. This settings allow you to close it automatically at the end of the execution. This setting has no effect if you chose not to show the real-time progress details window during test execution. |
| Tree's expand-all button (should not be used on big instances) |
If you have some very large trees (i.e. more than several hundreds of folders), expanding all the folders in one click may be a very expensive task (that's why Microsoft does not provide this in their file explorer). This parameter will authorize or not the expand-all button. |
| Horizontally scrollable tables (only starting with XStudio Professional) |
When a table is displayed some people prefer having this table automatically fit the available space in the container panel. Some other people prefer let the table keeps its column's preferred dimension and have an horizontal scrollbar to scroll over the whole table if it's too big for the available space. This parameter will allow you to select your preferences. |
| Default SUT automatically pre-selected in GUI | If this option is set, the system will remember the last selected SUT and will pre-select it in all the new forms that require to select a SUT. |
Tree Columns
All the following options will determine which columns on each tree you want to display by default.| Field | Description |
| Display coverage column in SUT tree | <Self-explanatory> |
| Display coverage numbers column in SUT tree | <Self-explanatory> |
| Display quality column in SUT tree | <Self-explanatory> |
| Display quality numbers column in SUT tree | <Self-explanatory> |
| Display SUT numbers in SUT tree | <Self-explanatory> |
| Display coverage column in requirement tree | <Self-explanatory> |
| Display coverage numbers column in requirement tree | <Self-explanatory> |
| Display requirement numbers column in requirement tree | <Self-explanatory> |
| Display coverage column in specification tree | <Self-explanatory> |
| Display coverage numbers column in specification tree | <Self-explanatory> |
| Display specification numbers column in specification tree | <Self-explanatory> |
| Display test numbers column in test tree | <Self-explanatory> |
| Display test case numbers column in test tree | <Self-explanatory> |
| Display bug numbers column in test tree | <Self-explanatory> |
| Display progress column in campaign tree | <Self-explanatory> |
| Display progress numbers column in campaign tree | <Self-explanatory> |
| Display result column in campaign tree | <Self-explanatory> |
| Display result numbers column in campaign tree | <Self-explanatory> |
| Display campaign numbers column in campaign tree | <Self-explanatory> |
| Display campaign session numbers column in campaign tree | <Self-explanatory> |
| Display exploratory session numbers column in campaign tree | <Self-explanatory> |
| Display defect numbers column in defect tree | <Self-explanatory> |
| Display test numbers column in defect tree | <Self-explanatory> |
| Display project numbers column in project tree | <Self-explanatory> |
| Display sprint numbers column in project tree | <Self-explanatory> |
| Display task numbers column in project tree | <Self-explanatory> |
| Display user numbers column in user tree | <Self-explanatory> |
| Display asset numbers column in asset tree | <Self-explanatory> |
| Display agent numbers column in agent tree | <Self-explanatory> |
| Display document numbers column in document tree | <Self-explanatory> |
| Display SQL report numbers column in SQL report tree | <Self-explanatory> |
Optional Metrics
Computing certain metrics can be time-consuming on very large databases. So you may prefer to disable some to have some better performances.| Field | Description |
| Compute coverage metrics on root nodes | <Self-explanatory> |
| Compute coverage metrics on category nodes | <Self-explanatory> |
| Compute coverage metrics on folder nodes | <Self-explanatory> |
| Compute results at testcases level on root nodes | <Self-explanatory> |
| Compute results at testcases level on category nodes | <Self-explanatory> |
| Compute results at testcases level on folder nodes | <Self-explanatory> |
| Compute results at steps level on root nodes | <Self-explanatory> |
| Compute results at steps level on category nodes | <Self-explanatory> |
| Compute results at steps level on folder nodes | <Self-explanatory> |
| Compute results comparisons on root nodes | <Self-explanatory> |
| Compute results comparisons on folder nodes | <Self-explanatory> |
| Compute bug statistics on requirements tree's root node | <Self-explanatory> |
| Compute bug statistics on requirements tree's folder nodes | <Self-explanatory> |
| Compute bug statistics on specifications tree's root node | <Self-explanatory> |
| Compute bug statistics on specifications tree's folder nodes | <Self-explanatory> |
| Compute bug statistics on tests tree's root node | <Self-explanatory> |
| Compute bug statistics on tests tree's category node | <Self-explanatory> |
| Compute bug statistics on tests tree's folder node | <Self-explanatory> |
| Compute bug statistics on bugs tree's root node | <Self-explanatory> |
| Compute bug statistics on bugs tree's folder nodes | <Self-explanatory> |
| Compute bug statistics on SUT tree's SUT nodes | <Self-explanatory> |
| Display bug progression statistics on bugs tree's root node (perf. impact) | <Self-explanatory> |
| Display bug progression statistics on bugs tree's folder nodes (perf. impact) | <Self-explanatory> |
| Display bug progression statistics on SUT tree's SUT nodes (perf. impact) | <Self-explanatory> |
User Preferences
Your user preferences can be set through the Settings > User Preferences menu.This section contains all your personal preferences.
These preferences override the server settings and will apply only when logged with your username.
The Factory reset buton allows you to reset at any time your preferences.
If you do so, all your preferences are cleared and only the server settings will be applied.
Connectors
It can be useful to override some of the connector's parameters on a per-user basis.At any time you can choose to apply these overloaded parameters or not.
| Field | Description |
| Settings |
This combobox allows activating or not the overloading of the server parameters with the ones provided below.
|
Requirements
For third-party requirement connectors, you can use the default server settings but if you wish, you can also personalize some of them.For instance, you can choose to use your own personal account (on the third-party system) to retrieve the data from the third-party requirement system. This way, you're certain to get exactly the same items you get when you're logged in directly on the third-party system.
You can also choose to filter here some specific projects/issue types and status to retrieve.
Bug-tracking
For third-party bug-tracking connectors, you can use the default server settings but if you wish, you can also personalize some of them.For instance, you can choose to use your own personal account (on the third-party system) to retrieve the data from the third-party bug-tracking database. This way, you're certain to get exactly the same items you get when you're logged in directly on the third-party system.
You can also choose to filter here some specific projects/issue types and status to retrieve.
GUI
| Field | Description |
| Max number of selected nodes automatically expanded (large = perf. impact) |
When some tree show selected items, the system expand automatically the tree and show only the selected items. If this tree is very large (several hundreds or thousands of items selected), the expand task can be time-consuming and you may prefer getting the tree not expanded by default. This parameter will determine this limit. |
| Max age (in days) of completed items in the dashboard (0 = show only active items) |
The dashboard displays all the tasks you're supposed to work on. It also keeps the finished tasks for some time as it could be useful to check the last tasks you were working on. Of course, in this case, the progress bar is indicating 100%. This parameter defines the number of days the tasks will be kept in the dashboard after the task has been completed. If you set it to 0, the task will disappear immediately from the dashboard when it's finished. |
| Max items in auto-generated results tables (large = perf. impact) |
The philosophy behind XStudio is to show as much metrics and statistics as possible so that the user does not have to generate them manually or go through complicated wizards. However, some of those metrics takes time to be generated so you may want to disable some to optimize your user experience. This parameters will define the limit (in terms of number of data to treat) above which the metrics will be obtainable only on-demand. |
| Default test case procedure editor (Grid available only starting with XStudio Professional) |
The parameter will determine which editor to use by default to design your test cases.
2 choices are available:
|
| Rich text in test case procedure (only starting with XStudio Professional | This parameter will determine if you can use rich-text in your test case steps and expected results. |
| Grid editor auto-wrap text (only starting with XStudio Professional) |
If you select this option, the text will auto-wrap when your typing it in a test case procedure. If not, then the text will continue to grow until the next carriage return/line feed. |
| Show ids in trees | If this option is selected, most of the objects in the trees will have their names prefixed with their Ids. |
| Show real-time progress details window during test execution |
By default, when you start a campaign session, a window containing the real-time progress details of the execution is displayed. This window can bother some people and you may prefer just disabling it using this parameter. |
| Automatically close real-time progress details window after test execution |
By default, when you start a campaign session, a window containing the real-time progress details of the execution is displayed. At the end af the execution, this windows remains disdplayed. This settings allow you to close it automatically at the end of the execution. This setting has no effect if you chose not to show the real-time progress details window during test execution. |
| Tree's expand-all button (should not be used on big instances) |
If you have some very large trees (i.e. more than several hundreds of folders), expanding all the folders in one click may be a very expensive task (that's why Microsoft does not provide this in their file explorer). This parameter will authorize or not the expand-all button. |
| Horizontally scrollable tables (only starting with XStudio Professional) |
When a table is displayed some people prefer having this table automatically fit the available space in the container panel. Some other people prefer let the table keeps its column's preferred dimension and have an horizontal scrollbar to scroll over the whole table if it's too big for the available space. This parameter will allow you to select your preferences. |
| Default SUT automatically pre-selected in GUI | If this option is set, the system will remember the last selected SUT and will pre-select it in all the new forms that require to select a SUT. |
| Scaling |
On modern computers, especially those with a Retina/4K/5K support, the screen resolution can be huge. When the screen has a regular dimension it means the dpi is very high (much more than the standard 72 or 96 values computers have used since ages). This also means everything is viewed as extremely small by a human. So the operating systems are using a dpi-scaling system to make things bigger. If you are in this case, you can use this setting to force scaling the XStudio's GUI to a ratio that pleases you.
|
| Font size |
This setting will increase or decrease slightly the font size of all the widgets in the GUI.
Hence, a relative font size change is applied on all the texts (in text area, buttons, labels, progress bars etc.).
|
| Default mode when downloading an attachment that already exists in the destination path |
By default, when you download some attachments (i.e. when generating an HTML report), if the attachment already exists locally the system asks you if you accept to overwrite the existing local file. This can be the case for instance when generating report. Indeed, you can refer in the report at several distinct location to the same attachment. The repeated occurence of the confirmation box can be painful (and unnecessary as the destination folder is very likely a clean temp folder that has just been generated by the system). So it can make sense to avoid getting this popup and configure the system to download/overwrite or skip automatically.
|
Tree Columns
All the following options will determine which columns on each tree you want to display by default.| Field | Description |
| Display coverage column in SUT tree | <Self-explanatory> |
| Display coverage numbers column in SUT tree | <Self-explanatory> |
| Display quality column in SUT tree | <Self-explanatory> |
| Display quality numbers column in SUT tree | <Self-explanatory> |
| Display SUT numbers in SUT tree | <Self-explanatory> |
| Display coverage column in requirement tree | <Self-explanatory> |
| Display coverage numbers column in requirement tree | <Self-explanatory> |
| Display requirement numbers column in requirement tree | <Self-explanatory> |
| Display coverage column in specification tree | <Self-explanatory> |
| Display coverage numbers column in specification tree | <Self-explanatory> |
| Display specification numbers column in specification tree | <Self-explanatory> |
| Display test numbers column in test tree | <Self-explanatory> |
| Display test case numbers column in test tree | <Self-explanatory> |
| Display bug numbers column in test tree | <Self-explanatory> |
| Display progress column in campaign tree | <Self-explanatory> |
| Display progress numbers column in campaign tree | <Self-explanatory> |
| Display result column in campaign tree | <Self-explanatory> |
| Display result numbers column in campaign tree | <Self-explanatory> |
| Display campaign numbers column in campaign tree | <Self-explanatory> |
| Display campaign session numbers column in campaign tree | <Self-explanatory> |
| Display exploratory session numbers column in campaign tree | <Self-explanatory> |
| Display defect numbers column in defect tree | <Self-explanatory> |
| Display test numbers column in defect tree | <Self-explanatory> |
| Display project numbers column in project tree | <Self-explanatory> |
| Display sprint numbers column in project tree | <Self-explanatory> |
| Display task numbers column in project tree | <Self-explanatory> |
| Display user numbers column in user tree | <Self-explanatory> |
| Display asset numbers column in asset tree | <Self-explanatory> |
| Display agent numbers column in agent tree | <Self-explanatory> |
| Display document numbers column in document tree | <Self-explanatory> |
| Display SQL report numbers column in SQL report tree | <Self-explanatory> |
Optional Metrics
Computing certain metrics can be time-consuming on very large databases. So you may prefer to disable some to have some better performances.| Field | Description |
| Compute coverage metrics on root nodes | <Self-explanatory> |
| Compute coverage metrics on category nodes | <Self-explanatory> |
| Compute coverage metrics on folder nodes | <Self-explanatory> |
| Compute results at testcases level on root nodes | <Self-explanatory> |
| Compute results at testcases level on category nodes | <Self-explanatory> |
| Compute results at testcases level on folder nodes | <Self-explanatory> |
| Compute results at steps level on root nodes | <Self-explanatory> |
| Compute results at steps level on category nodes | <Self-explanatory> |
| Compute results at steps level on folder nodes | <Self-explanatory> |
| Compute results comparisons on root nodes | <Self-explanatory> |
| Compute results comparisons on folder nodes | <Self-explanatory> |
| Compute bug statistics on requirements tree's root node | <Self-explanatory> |
| Compute bug statistics on requirements tree's folder nodes | <Self-explanatory> |
| Compute bug statistics on specifications tree's root node | <Self-explanatory> |
| Compute bug statistics on specifications tree's folder nodes | <Self-explanatory> |
| Compute bug statistics on tests tree's root node | <Self-explanatory> |
| Compute bug statistics on tests tree's category node | <Self-explanatory> |
| Compute bug statistics on tests tree's folder node | <Self-explanatory> |
| Compute bug statistics on bugs tree's root node | <Self-explanatory> |
| Compute bug statistics on bugs tree's folder nodes | <Self-explanatory> |
| Compute bug statistics on SUT tree's SUT nodes | <Self-explanatory> |
| Display bug progression statistics on bugs tree's root node (perf. impact) | <Self-explanatory> |
| Display bug progression statistics on bugs tree's folder nodes (perf. impact) | <Self-explanatory> |
| Display bug progression statistics on SUT tree's SUT nodes (perf. impact) | <Self-explanatory> |
Internationalization
The internationalization settings can be set through the Settings > Internationalization menu.A user is given a language (localization) which is used to display the application in the user's language but is also associated with a location (internationalization) used to know which public holidays and week-ends this user will be associated with.
This section allows customizing the location settings.
Each country can be easily configured: public holidays can be added, edited and deleted. In addition, each country is associated to week-ends settings. Most countries in the world use Saturday and Sunday for the week-end but some (such as Israel, Qatar, Algeria etc.) use Friday and Saturday while others (such as Saudi Arabia) have Thursday and Friday.
The default settings are supposed to be correct but it's good to let the system administrator customize it if necessary. These settings are accessible through the Settings menu entry.


Hence, all calendars are affected by this change as each user may have different week-ends.
Absences are also included in the calendars so you have a complete picture of the projects and the staff workload, status are then easier to figure out.

Week-ends and holidays are easily identifiable as they are in black and grey
Note that the calendar tree is still, as usual, expandable. This greatly facilitates its reading i.e. when you want to know the details about why a user is overloaded in a certain time frame.
A legend (including some gradient colors for the workload) has been added to help the reading.
Secure connections
If you're using a secure connection (TLS, SSL servers, https or ldaps URLs) you'll need to manually import the server's certificate in your XStudio server's settings.(alternatively you can import the server certificate in all your client's key stores - of course, clients that will never athenticate to the secure servers, will not need that).
Get the certificate
You'll need the x.509 certificate file of the third-party you want to connect to.Many different formats/extensions exist for such certificates (
.crt, .der, .pem, .csr, .p12) but you'll need to get it in a format similar to this:
This kind of format is most of the time stored in a
.crt or a .pem file that you can open with any text editor (i.e. Notepad).To be valid, it MUST include the
-----BEGIN CERTIFICATE----- prefix and -----END CERTIFICATE----- postfix.
Each line must also terminate with a carriage return/line feed.
How to retrieve a TLS Database server's certificate:
If for example you're planning to use a MySQL or MariaDB server using TLS/SSL secure connection, you'll need to import the server's certificate.
To retrieve this server's certificate the only way is to ask the person in charge of the database.
All the private keys and certificates are on the server itself but of course you will only need the X.509 server certificate.
It's very likely that the file is named
server-cert.pem
How to retrieve a https website's certificate:
An easy way to export the certificate from a secure website is to open it using your favorite browser and export it from there.
Let's imagine you need to connect XStudio with VersionOne.
First of all, you may need to temporarily disable any antivirus you may have before saving the server's certificate.
Hence, many antivirus programs install their own SSL certificate as a root certificate so that they can man-in-the-middle all HTTPS traffic to scan for potential malware.
In this case, if you leave your antivirus active, the exported certificate may be invalid.
Browse the secure website using Firefox (you can do that also using another browser but the procedure will be slightly different) and do the following:
Click on the SSL icon in the address bar and ask for more information:


View the certificate and export it to a


To retrieve a https server's certificate you can also use openssl and run a command similar to this one:
WARNING: Public certificates tend to expire pretty often so it's advised to use your own server and certificate.
(You can get OpenSSL directly from our tools repository)
An easy way to export the certificate from a secure website is to open it using your favorite browser and export it from there.
Let's imagine you need to connect XStudio with VersionOne.
First of all, you may need to temporarily disable any antivirus you may have before saving the server's certificate.
Hence, many antivirus programs install their own SSL certificate as a root certificate so that they can man-in-the-middle all HTTPS traffic to scan for potential malware.
In this case, if you leave your antivirus active, the exported certificate may be invalid.
Browse the secure website using Firefox (you can do that also using another browser but the procedure will be slightly different) and do the following:
Click on the SSL icon in the address bar and ask for more information:


View the certificate and export it to a
.crt file:


To retrieve a https server's certificate you can also use openssl and run a command similar to this one:
openssl s_client -connect www.acme.com:443 oropenssl s_client -servername www.acme.com -connect www.acme.com:443WARNING: Public certificates tend to expire pretty often so it's advised to use your own server and certificate.
(You can get OpenSSL directly from our tools repository)
How to retrieve an LDAP server's certificate:
You can for example use Apache Directory Studio (a great open-source program to manage LDAP servers).
Create a new connection to the secure LDAP server, then export the certificate from the Preferences menu:

This will generate a file similar to:
To retrieve the LDAP server's certificate you can also use openssl and run a command similar to this one:
WARNING: Public certificates tend to expire pretty often so it's advised to use your own server and certificate.
(You can get OpenSSL directly from our tools repository)
You can for example use Apache Directory Studio (a great open-source program to manage LDAP servers).
Create a new connection to the secure LDAP server, then export the certificate from the Preferences menu:

This will generate a file similar to:
To retrieve the LDAP server's certificate you can also use openssl and run a command similar to this one:
openssl s_client -connect ldap.acme.com:636 oropenssl s_client -servername ldap.acme.com -connect ldap.acme.com:636WARNING: Public certificates tend to expire pretty often so it's advised to use your own server and certificate.
(You can get OpenSSL directly from our tools repository)
How to retrieve a SSL SMTP Server's certificate:
If for example you're planning to use a third-party SMTP server using SSL secure connection, you'll need to import the server's certificate.
To retrieve this server's certificate you'll need to use openssl and run a command similar to this one:
WARNING: Public certificates (from GMail or Outlook etc.) tend to expire pretty often so it's advised to use your own server and certificate.
(You can get OpenSSL directly from our tools repository)
If for example you're planning to use a third-party SMTP server using SSL secure connection, you'll need to import the server's certificate.
To retrieve this server's certificate you'll need to use openssl and run a command similar to this one:
openssl s_client -connect smtp.gmail.com:465 oropenssl s_client -servername smtp.gmail.com -connect smtp.gmail.com:465WARNING: Public certificates (from GMail or Outlook etc.) tend to expire pretty often so it's advised to use your own server and certificate.
(You can get OpenSSL directly from our tools repository)
How to retrieve a TLS SMTP Server's certificate:
If for example you're planning to use a third-party SMTP server using TLS secure connection, you'll need to import the server's certificate.
To retrieve this server's certificate you'll need to use openssl and run a command similar to this one:
WARNING: Public certificates (from GMail or Outlook etc.) tend to expire pretty often so it's advised to use your own server and certificate.
(You can get OpenSSL directly from our tools repository)
If for example you're planning to use a third-party SMTP server using TLS secure connection, you'll need to import the server's certificate.
To retrieve this server's certificate you'll need to use openssl and run a command similar to this one:
openssl s_client -connect smtp.gmail.com:587 -starttls smtp oropenssl s_client -servername smtp.gmail.com -connect smtp.gmail.com:587 -starttls smtpWARNING: Public certificates (from GMail or Outlook etc.) tend to expire pretty often so it's advised to use your own server and certificate.
(You can get OpenSSL directly from our tools repository)
Add the certificate in the server settings
Open the certificate file in a text editor and copy the plain-text content in XStudio's proper setting: