

How to run an XAgent (with a custom alias) in 1 minute
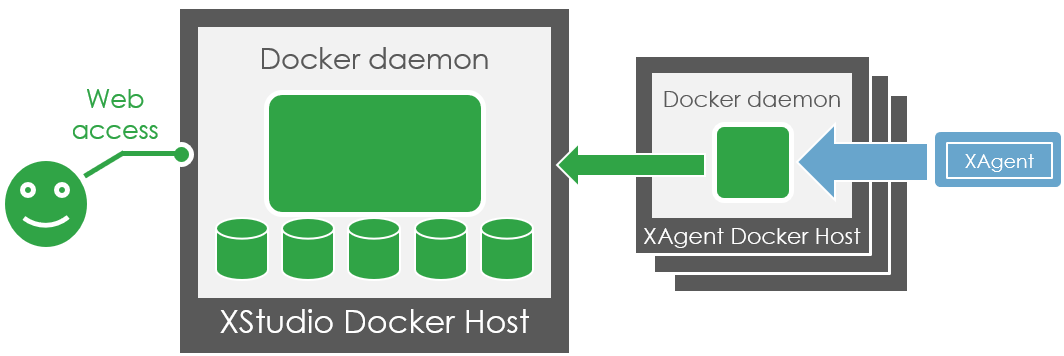
If you need to execute automated tests, then you'll probably need an agent to execute them.It can even be useful to have several agents to execute several sessions in parallel or just to have dedicated agent for each test type.
To do this, just follow the simple procedure below.
On a Windows or Linux host
docker pull xqual/xagent-linux:v12sp1docker run --name xagent-linux-container1 -it -e SERVER_NAME=<xstudio-docker-host-name> -e SERVER_PROTOCOL=http -e SERVER_PORT=8080 -e XSTUDIO_USER=admin -e XSTUDIO_PASSWORD_ENCRYPTED=14594A028745E255AA16A9D6D37D8D61 -e XAGENT_ALIAS=DockerAgent1 xqual/xagent-linux:v12sp1 bash/root/start-app.sh(this updates all the configuration files and run XAgent)tail -f /usr/local/xqual/xstudio/xagent-log.txt(to check the output of XAgent)
docker exec -it xagent-linux-container1 bash) to interact with it for instance to get traces etc.If you wish to run several agents, you can use the same method but please make sure to change the name of the container and the XAGENT_ALIAS parameter:
docker run --name xagent-linux-container1 -it -e SERVER_NAME=<xstudio-docker-host-name> -e SERVER_PROTOCOL=http -e SERVER_PORT=8080 -e XSTUDIO_USER=admin -e XSTUDIO_PASSWORD_ENCRYPTED=14594A028745E255AA16A9D6D37D8D61 -e XAGENT_ALIAS=DockerAgent1 xqual/xagent-linux:v12sp1 bashdocker run --name xagent-linux-container2 -it -e SERVER_NAME=<xstudio-docker-host-name> -e SERVER_PROTOCOL=http -e SERVER_PORT=8080 -e XSTUDIO_USER=admin -e XSTUDIO_PASSWORD_ENCRYPTED=14594A028745E255AA16A9D6D37D8D61 -e XAGENT_ALIAS=DockerAgent2 xqual/xagent-linux:v12sp1 bashdocker run --name xagent-linux-container3 -it -e SERVER_NAME=<xstudio-docker-host-name> -e SERVER_PROTOCOL=http -e SERVER_PORT=8080 -e XSTUDIO_USER=admin -e XSTUDIO_PASSWORD_ENCRYPTED=14594A028745E255AA16A9D6D37D8D61 -e XAGENT_ALIAS=DockerAgent3 xqual/xagent-linux:v12sp1 bash...
This allows you to get an unlimited number of agents based on your needs (how many tests to execute and how to spread them on different agents).
To stop and exit an old XAgent container with name 'xagent-linux-container1':
docker ps -adocker rm xagent-linux-container1Image xqual/xagent-linux
To get this image individually:docker pull xqual/xagent-linux:v12sp1
This Docker image runs a linux server including an instance of XAgent. The container actually contains all the available fat clients:
- XAgent
- XContinuousIntegration
- XImporter
- XReportDebugger
- XReportGenerator
- XDatabaseShifter
- and even XStudio
The docker needs a few parameter to be customized with your own preferences:
| Parameter | Description | Example |
| SERVER_NAME | Name of the XStudio docker host | my-docker-host.acme.com |
| SERVER_PROTOCOL | Protocol to connect to the XStudio server | http (or https if you provide a SSL certificate) |
| SERVER_PORT | Port to connect to the XStudio server | 8080 (or 8443 if you provide a SSL certificate) |
| XSTUDIO_USER | Name of the XStudio account that will be used to connect to the REST API | admin |
| XSTUDIO_PASSWORD_ENCRYPTED | Encrypted password that will be used to connect to the REST API | password |
| XAGENT_ALIAS | Alias that the agent will use | - |
| LICENSE_KEY (opt.) | The license key you purchased from us If you do not provide a license key, the server will stay in community version with all its limitations |
DockerAgent1 |
Based on the above example values, the image can be run in a container using the command:
docker run --name xagent-linux-container

    -e SERVER_NAME=my-docker-host.acme.com

    -e SERVER_PROTOCOL=http

    -e SERVER_PORT=8080

    -e XSTUDIO_USER=admin

    -e XSTUDIO_PASSWORD_ENCRYPTED=984F1197F84B21DDA2A631F72F9D082501B4FA1AA3798DC420A26ADE0B8792504325EBD701

    -e XAGENT_ALIAS=DockerAgent1

	-e LICENSE_KEY=<license_key>

	xqual/xagent-linux:v12sp1
That's it! the XAgent is running and you can run some test sessions on this agent (aliased as **DockerAgent1**)
Administration
NOTE: When the container is running, you can log in to it (for instance to check the log) by running the command:docker exec -it xagent-linux-container bash
Alternatively, you can run it this way:
docker run --name xagent-linux-container

	-it

    -e SERVER_NAME=my-docker-host.acme

    -e SERVER_PROTOCOL=http

    -e SERVER_PORT=8080

    -e XSTUDIO_USER=admin

    -e XSTUDIO_PASSWORD_ENCRYPTED=984F1197F84B21DDA2A631F72F9D082501B4FA1AA3798DC420A26ADE0B8792504325EBD701

    -e XAGENT_ALIAS=DockerAgent1

	-e LICENSE_KEY=<license_key>

	xqual/xagent-linux:v12sp1 bash
In this case, you will need to run the configuration script manually first:
/root/config-app.shThen run manually XAgent (or any other program in
/usr/local/xqual/xstudio):cd /usr/local/xqual/xstudiojava -jar xagent.jar --alias DockerAgent1 --headless true (for instance)