

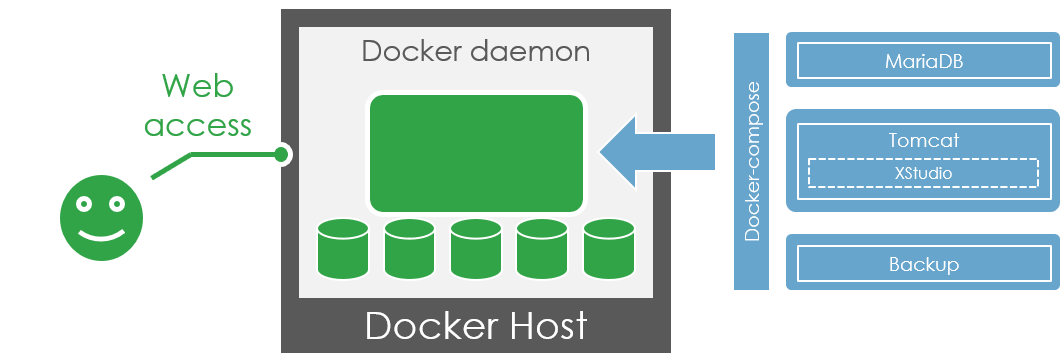
Architecture
A whole instance of XStudio can be deployed using a docker-compose.yml file that will reference the 3 official docker images hosted on Docker Hub.
Note:
If you already have a MySql or MariaDb server, the xstudio-mariadb image may not be necessary as you can configure the xstudio-tomcat to connect to any other MySQL/MariaDB server. The xstudio-backup may not be necessary either if you already have your own proper backup mechanism for the database.
If you already have a MySql or MariaDb server, the xstudio-mariadb image may not be necessary as you can configure the xstudio-tomcat to connect to any other MySQL/MariaDB server. The xstudio-backup may not be necessary either if you already have your own proper backup mechanism for the database.
How to install and run a complete XStudio server in 2 minutes
If you already know about Docker and doesn't need to go into the details of the images we deliver, you will find in this section a simple procedure to install an XStudio Server in just 2 minutes thanks to Docker.To do this, here are some some examples of .env and docker-compose.yml files.
On a Windows host
- Install Docker for Windows on the host
cd "C:\Users\<Your Name>"mkdir xqualcd xqual- Download and copy the 2 files below in
"C:\Users\<Your Name>\xqual\"
- docker-compose.yml
- .env
(ensure the downloaded file is properly named.env(starting with a '.' character). If not, rename it accordingly) docker-compose up
On a Linux host
- Install Docker for Linux on the host
cd /home/<Your Name>mkdir xqualcd xqual- Download and copy the 2 files below in
/home/<Your Name>/xqual/
- docker-compose.yml
- .env docker-compose up
That's it! you'are all set.
From the Docker host, you can access your server by browsing
http://localhost:8080/xqual/xstudio.webUsername: admin
Password: password
You can also access your server programmatically through its REST API on
http://localhost:8080/xqual/apiExample:
http://localhost:8080/xqual/api?command=getInfoIf you prefer using the legacy java/jnlp application, you'll need java 7-9 on your computer and you can start it from:
http://localhost:8080/xqual/xstudio with the same credentialsAccessibility
If you want to make this service accessible from other users on your network, you need to edit the.env file and change the value of the SERVER_NAME parameter so that it matches your Docker host.For instance:
SERVER_NAME=192.168.10.1(if the users are on the same subnet than the host, if they can connect to the host's IP@ and if that IP@ is static)SERVER_NAME=my-docker-host(if the users are on the same subnet than the host and can connect to it using its your computer name)SERVER_NAME=my-docker-host.acme.com(if your users can connect through LAN/WAN to the host using its resolvable name)
docker-compose.yml file depending on how you want your docker environment to be accessible (from within you host, local network or external network).Administration
You can access to the tomcat container using this commmand:docker exec -it xstudio-tomcat-container bash.The XStudio server is installed in
/usr/local/tomcat/webapps/.The logs are visible in
/usr/local/tomcat/logs/.You can also access some useful data from the persistant volumes using Docker Desktop (or through the docker CLI). The volumes available are:
- xstudio-volume-tomcat-logs (XStudio server's log)
- xstudio-volume-backup (repository containing all daily backups)
- xstudio-volume-mariadb-dbdata (the database data file)
- xstudio-volume-mariadb-conf (the database server configuration files)
- xstudio-volume-tomcat-conf (copy of the configuration files - used when updating XStudio using newer docker images - please check the update instructions)
- xqual/xstudio-mariadb:v96
- xqual/xstudio-tomcat:v12sp1
- xqual/xstudio-backup:v1 (optional)
- the the web client XStudio.web
- the JNLP client XStudio
- the XStudio App for JIRA
- the REST API server
- Insert a license key
- Customize the visuals of XStudio with your own logo, icon, splashscreen or title in the header of the application or the reports
- Expose the XStudio.web URL as HTTPS
- Make the three containers communicate together
- Make some of the data persistent (such as the database data!)
- Make some of the data shared among different containers (such as the backup repository)
- create a dedicated folder on the docker daemon host
- put the docker-compose.yml in that folder
- create a .env file in that folder containing all the parameter values you want
- execute the command
docker-compose up
Make the configuration persistent
XStudio's configuration files are stored in/usr/local/tomcat/webapps/xqual and /usr/local/tomcat/webapps/xqual/xstudio which is not a persistent volume.This means if you do a
docker-compose down and a docker-compose up your configuration is lost.
This is especially true when you update XStudio by picking a newest version of the image xqual/xstudio-tomcat in your docker-compose.yml.
To circumvent this, each time you change something in the configuration it's advised to save the configuration files in the xstudio-volume-tomcat-conf persistent volume (
To do this, you just to connect to the xstudio-tomcat-container and copy the configuration files to
While doing this, you indicate docker that those are your reference configuration files.
When you do a
/root/conf in the xqual/xstudio-tomcat container).To do this, you just to connect to the xstudio-tomcat-container and copy the configuration files to
/root/conf/xqual.
	docker exec -it xstudio-tomcat-container bash


	cp /usr/local/tomcat/webapps/xqual/xstudio.conf             /root/conf/xqual/

	cp /usr/local/tomcat/webapps/xqual/requirement.conf         /root/conf/xqual/

	cp /usr/local/tomcat/webapps/xqual/bugtracking.conf         /root/conf/xqual/

	cp /usr/local/tomcat/webapps/xqual/sso.conf                 /root/conf/xqual/

	cp /usr/local/tomcat/webapps/xqual/xstudio/xstudio.conf     /root/conf/xqual/xstudio/

	cp /usr/local/tomcat/webapps/xqual/xstudio/requirement.conf /root/conf/xqual/xstudio/

	cp /usr/local/tomcat/webapps/xqual/xstudio/bugtracking.conf /root/conf/xqual/xstudio/

	cp /usr/local/tomcat/webapps/xqual/xstudio/sso.conf         /root/conf/xqual/xstudio/
While doing this, you indicate docker that those are your reference configuration files.
When you do a
docker-compose up then it checks if there are some files in the persistent volume and if there are copy them on the fly in the new container.
Docker images
Each of the three docker images can be fetched from Docker Hub the usual way with the following tags:For a complete XStudio server:
xqual/xstudio-mariadb
To get this image individually:docker pull xqual/xstudio-mariadb:v96
This Docker image runs the database server (which is MariaDB a real open-source fork of MySQL)
The tag (i.e. "v96") represents the version of the database schema.
Please refer to the compatibility table below to use a version compatible with the xqual/xstudio-tomcat image's version.
The docker needs a few parameter to be customized with your own preferences:
| Parameter | Description | Example |
| MYSQL_ROOT_PASSWORD | Root password of the MariaDB database server | rootpwd |
| MYSQL_DATABASE | Name of the database that will host XStudio's data | xstudiodb |
| MYSQL_USER | Name of the MariaDB account that XStudio will use | xstudio |
| MYSQL_PASSWORD | Clear password of the MariaDB account that XStudio will use | xstudiopwd |
docker run --name xstudio-mariadb-container --publish 3306:3306

	-e MYSQL_ROOT_PASSWORD=rootpwd

	-e MYSQL_DATABASE=xstudio_db

	-e MYSQL_USER=xstudio

	-e MYSQL_PASSWORD=xstudiopwd

	xqual/xstudio-mariadb:v96
It is not really useful to run this container by itself though. You should use
Docker-compose to run it as part as an integrated instance.Please refer the sections How to install and run a XStudio server in 2 minutes or Run all the XStudio images in an integrated environment for more details.
xqual/xstudio-tomcat
To get this image individually:docker pull xqual/xstudio-tomcat:v12sp1
This Docker image runs the core system of the XStudio server. This server includes a servlet container (Tomcat) listening on port 8080 in HTTP (and optionally on port 8443 in HTTPS if you provide an optional certificate corresponding to the domain where you will install the service).
The server will expose several entry-points:
The docker needs a few parameter to be customized with your own preferences:
| Parameter | Description | Example |
| SERVER_NAME | Name of the server | xstudio-prod1.acme.com |
| SERVER_PROTOCOL | Protocol to connect to the server | http (or https if you provide a SSL certificate) |
| SERVER_PORT | Port to connect to the server | 8080 (or 8443 if you provide a SSL certificate) |
| MYSQL_DATABASE | Name of the database that will host XStudio's data | xstudiodb |
| MYSQL_USER | Name of the MariaDB account that XStudio will use | xstudio |
| MYSQL_PASSWORD_ENCRYPTED | Encrypted password of the MariaDB account that XStudio will use You can encrypt a clear password using our REST API service, however we advise to start with the default value which is 560B599C2331BE79C3ADD6621DBE8BDC which corresponds to the user xstudio with clear password xstudiopwd) |
- |
| XSTUDIO_USER | Name of the XStudio account that will be used to connect to the REST API | admin |
| XSTUDIO_PASSWORD_ENCRYPTED | Encrypted password that will be used to connect to the REST API | password |
| LICENSE_KEY (opt.) | The license key you purchased from us If you do not provide a license key, the server will stay in community version with all its limitations |
- |
| CUSTOMER_INSTANCE_NAME (opt.) | Name of the folder on the remote ftp server for backup | acme_prod_1 |
| SSL_KEYSTORE_ALIAS (opt.) | The alias to use with the Java Keystore containing the certificate for the SSL access | 1 |
| SSL_KEYSTORE_PASSWORD (opt.) | The password to use with the Java Keystore containing the certificate for the SSL access | acmepwd |
Based on the above example values, the image can be run in a container using the command:
docker run --name xstudio-backup-container

    -e SERVER_NAME=my-docker-host.acme.com

    -e SERVER_PROTOCOL=http

    -e SERVER_PORT=8080

	-e MYSQL_DATABASE=xstudio_db

	-e MYSQL_USER=xstudio

	-e MYSQL_PASSWORD_ENCRYPTED=560B599C2331BE79C3ADD6621DBE8BDC

    -e XSTUDIO_USER=admin

    -e XSTUDIO_PASSWORD_ENCRYPTED=984F1197F84B21DDA2A631F72F9D082501B4FA1AA3798DC420A26ADE0B8792504325EBD701

	-e LICENSE_KEY=<license_key>

	-e CUSTOMER_INSTANCE_NAME=acme_prod_1

	-e SSL_KEYSTORE_ALIAS=1

	-e SSL_KEYSTORE_FILENAME=certificate.jks

	-e SSL_KEYSTORE_PASSWORD=acmepwd

	xqual/xstudio-tomcat:v12sp1
NOTE: When the container is running, you can log in to it (for instance to check the log) by running the command:
docker exec -it xstudio-tomcat-container bash
Visuals customization
If you wish to customize your XStudio instance with some custom visuals, you must copy some files with specific names in the xstudio-volume-tomcat-conf persistant volume.
	/root/conf/visuals/icon.png

	/root/conf/visuals/logo.png

	/root/conf/visuals/splashscreen.png

	/root/conf/visuals/custom.app_title.txt

	/root/conf/visuals/custom.report.docx_header.txt
You can include only the visuals you are interested in.
Here is a description of each files your repository can host:
| Filename | Description | Requirements |
| icon.png | Will be used as the JNLP client's icon | PNG file with a dimension 16x16 pixels |
| logo.png | Will be used for instance in the header of the paper reports | PNG file with a dimension preferably not exceeding 300x300 pixels |
| splashscreen.png | Will be used as splashscreen of the JNLP client | PNG file with a dimension preferably not exceeding 700x700 pixels |
| custom.app_title.txt | Will be used as application title in the JNLP client's header | Text file containing only a one-line text (do NOT add a new line feed at the end) |
| custom.report.docx_header.txt | Will be used in the header of the .docx paper reports | Text file containing only a one-line text (do NOT add a new line feed at the end) |
Https configuration
If you wish to customize your XStudio instance to be accessible through https, you must copy your certificate (in Java KeyStore format and renamed ascertificate.jks) in the xstudio-volume-tomcat-conf persistant volume.
/root/conf/ssl/certificate.jks
It is not really useful to run this container by itself though. You should use
Docker-compose to run it as part as an integrated instance.Please refer the sections How to install and run a XStudio server in 2 minutes or Run all the XStudio images in an integrated environment for more details.
Based on the nature of the Docker host server, you may be required to do the following to have wkhtmltopdf library (and hence the PDF reporting) to work nicely on 64bits systems:
		wget https://github.com/wkhtmltopdf/packaging/releases/download/0.12.6.1-2/wkhtmltox_0.12.6.1-2.jammy_amd64.deb
		apt update
		apt install ./wkhtmltox_0.12.6.1-2.jammy_amd64.deb
		rm /usr/local/tomcat/webapps/xqual/wkhtml/linux32/bin/wkhtmltopdf
		ln -s /usr/local/bin/wkhtmltopdf /usr/local/tomcat/webapps/xqual/wkhtml/linux32/bin/wkhtmltopdf
xqual/xstudio-backup
To get this image individually:docker pull xqual/xstudio-backup:v1
This Docker image runs the backup operations of the database (operated by the xqual/xstudio-mariadb image)
The tag (i.e. "v1") just represents the version of the image and has no compatibility constraint with the other images.
This docker image can take optional parameters which are used only if you wish to transfer the latest backup once a week on a third-party FTP server.
The daily backups are create at 2am local time and stored locally in the
/home/backup folder.The weekly transfer to a third-party FTP server is executed at 3am local time (if configured).
The docker needs a few parameter to be customized with your own preferences:
| Parameter | Description | Example |
| MYSQL_DATABASE | Name of the database that will host XStudio's data | xstudiodb |
| MYSQL_USER | Name of the MariaDB account that XStudio will use | xstudio |
| MYSQL_PASSWORD | Clear password of the MariaDB account that XStudio will use | xstudiopwd |
| BACKUP_FTP_HOST (opt.) | FTP host where the latest backup can be sent on a weekly basis | ftp-server.acme.com |
| BACKUP_FTP_USER (opt.) | Username to connect to the FTP server | ftpuser |
| BACKUP_FTP_PASSWORD (opt.) | Clear password to connect to the FTP server | ftpuserpwd |
| CUSTOMER_INSTANCE_NAME (opt.) | Name of the folder that will store the weekly backup | acme_prod_1 |
Based on the above example values, the image can be run in a container using the command:
docker run --name xstudio-backup-container

	-e MYSQL_DATABASE=xstudio_db

	-e MYSQL_USER=xstudio

	-e MYSQL_PASSWORD=xstudiopwd

	-e BACKUP_FTP_HOST=ftp-server.acme.com

	-e BACKUP_FTP_USER=ftpuser

	-e BACKUP_FTP_PASSWORD=ftpuserpwd

	-e CUSTOMER_INSTANCE_NAME=acme_prod_1

	xqual/xstudio-backup:v1
Thanks to the optional parameters, once a week, the latest recorded backup will be transfered to the FTP server ftp-server.acme.com (connecting as ftpuser with password ftpuserpwd) in the root folder acme_prod_1
It is not really useful to run this container by itself though. You should use
Docker-compose to run it as part as an integrated instance.Please refer the sections How to install and run a XStudio server in 2 minutes or Run all the XStudio images in an integrated environment for more details.
More details on docker Compose
All three images can be run individually in containers as explained above but what is still missing is:That's where Docker-compose gets in the game.
Docker-compose needs a docker-compose.yml file that describes how the 3 containers are integrated together, which volumes are necessary, which container can access them etc.
Then, Docker-compose fetch the images from Docker Hub, run them in a common network, mount some volumes and make them accessible by some of the containers.
The volumes are persistent and stored in the docker environment of the host so that the user can access them easily.
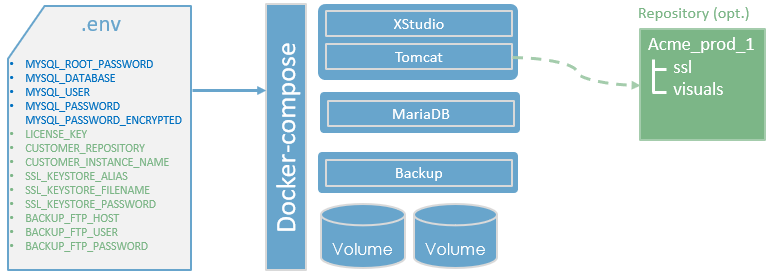
(green parts are optional)
You can pass all the customization parameters by having them in a dedicated file named
.env
In the end, the only things you need to do to create a new XStudio instance is:
.env file (in the same directory) to get all the parameters, and will run the three containers accordingly.
Versions
The xqual/xstudio-mariadb and xqual/xstudio-tomcat services must have some compatible versions to work together (without any additional step).| xqual/xstudio-tomcat | xqual/xstudio-mariadb |
| 11beta, 11beta2, 11beta3, 11, 11sp1, 11sp2, 11sp3, 11sp4, 11sp5, 12beta, 12beta2, 12beta3, 12, 12sp1 | v96 |
| 10beta2, 10beta3, 10, 10sp1, 10sp2, 10sp3, 10sp4, 10sp5, 10sp6, 10sp7, 10sp8, 10sp9, 10sp10 | v95 |
| 10beta | v94 |
| 9beta, 9, 9sp1, 9sp2, 9sp3, 9sp4, 9sp5 | v93 |
| 8beta, 8, 8sp1 | v92 |
| 7beta, 7, 7sp1, 7sp2, 7sp3, 7sp4, 7sp5, 7sp6 | v91 |
| 6beta1, 6beta2, 6beta3, 6beta4, 6, 6sp1, 6sp2, 6sp3, 6sp4, 6sp5 | v90 |
| 5, 5sp1, 5sp2, 5sp3, 5sp4, 5sp4c, 5sp6 | v89 |
| 4.1, 4.1sp1, 4.1sp2, 4.1sp3, 4.1sp4, 4.1sp5, 4.1sp6, 4.1sp7, 4.1sp8, 4.1sp9, 4.1sp10 | v88 |