

The requirements
Requirements can be handled directly by XStudio or retrieved from:
- JIRA (see JIRA (XML-RPC) Requirements settings or JIRA (REST) Requirements settings).
- VersionOne (see VersionOne Requirements settings).
Here is a typical requirements tree. It displays a number of useful pieces of information:
- the total number of requirements
- the number of requirements in each folder
- the status of each requirement (indicated by the color of the icon)
- the priority of each requirement (indicated by the
 column)
 - the risk level of each requirement (indicated by the
 column)

Requirements are all the business requirements the SUT should comply with. Generally, the requirements list is the first thing to do before working on detailed specification. In a perfect world, the SUT should come with a list of requirements but this may not be the case.
Entering the requirements of the SUT is an optional task. We do encourage to completely define the requirements though. This information is mandatory for coverage reporting.
In the requirements tree, you can add the complete description of each requirement or you can decide to just point to the external requirements document(s).
It is possible to group/organize the requirements by creating a structure of folders and sub-folders hosting the requirements.
Coverage Metrics
In order to have a quantifiable follow-up of the coverage, the requirements tree includes a coverage column showing at a glance the coverage of each requirement in the tree. Coverage is also consolidated at folder level.The coverage indicator provides the completion estimate in terms of specifications or tests.
Depending on the type of coverage requested (through the Coverage drop-down menu), the three will include different kinds of coverage:
By specifications
To view the coverage indicator by specifications:- in the tree, select a requirement
- click on the drop-down list Coverage

- select "By specifications" item
- the requirement coverage and the number of specifications linked to this requirement are displayed

The coverage of each requirement in the tree is directly taken from the value in its Details tab.
By default, when a requirement is being created, a 0% value will be assigned to it. As soon as one specification is linked to the current requirement, the coverage indicator of the current requirement will switch automatically to 100%. However, you can manually edit it, refining the coverage value between 0% and 100%. For instance, if you think that you will need approximately 10 specifications to cover the requirement and that you already have linked 2 of them, just set the coverage to 20%.
NOTE: This feature is what will allow you to get a truly reliable coverage metrics.
NOTE: If no specification is linked to the current requirement, you cannot manually edit the coverage indicator. If you try to edit it anyway, the following message will pop up:


To edit the coverage indicator
- select a requirement
- click on Details menu
- set the value of Coverage by specifications (%) field
- click on submit
- the requirement coverage is modified in the tree

By tests
The requirements are indirectly covered by tests. To view the coverage by tests:- click on the drop-down list Coverage and select

- the requirement coverage and the number of tests linked to this requirement are displayed

The coverage of each requirement is calculated based on:
- its coverage by specifications,
- the coverage by tests and the weight of each specification linked to the requirement.

The weight of each specification is calculated according to its degree of priority using this simple mapping:
| Priority | Weight | |
| Low | 1 | |
| Normal | 2 | |
| High | 3 |
Coverage aggregation
For each folder the coverage is calculated by aggregation, based on the coverage of its underlying objects.For instance, the coverage by specifications of a folder will be calculated using the formula:

Searching
For more details, please refer to the Searching objects chapter.Importing data
If you are migrating from manual test management - using for instance a basic spreadsheet application - or another test management system to XStudio you may want to import all your tests and test cases from Excel, CSV (semi-column ';' delimited) or XML.For more details, please refer to the thoroughly Import data tutorial.
The root node
Tabs
Traceability Matrix
One of the major interests in using a test management tool is the ability to trace what is covered and what is notTo get the global requirements traceability matrix:
- switch to the Requirements module on the side bar
- select the root folder in the tree
- on the right panel, select the Traceability Matrix tab
- the requirements tree appears, including in the right column, all the specifications (or all the tests if you disabled the specifications in your settings) covering each requirement.

This traceability matrix is also present in the requirement book (that can be generated from XStudio).
Coverage
The Coverage tab will display the coverage details of the root folder in terms of SUTs, specifications (if enabled) and tests.In addition, some advice is given to improve the coverage of the root folder:


Statistics
The Statistics tab will display some metrics based on all the requirements in the tree:- A status breakout pie chart showing how many requirements exist for each status
- A priority breakout pie chart showing how many requirements exist for each priority
- A risk breakout pie chart showing how many requirements exist for each risk level

Custom fields
You can customize the requirement by creating some new custom fields that will appear in the Details tab of the requirement.Custom fields can have different types: text fields, drop-down menu, checkbox, formatted text field. They can also be marked as mandatory or not and are positioned at the index you specify.
The Custom fields tab enables you to create, edit and delete custom fields.

Create a custom field
Here is the process to create a custom field for a requirement:- select the root folder in the tree
- on the right panel, click on the create custom field button

- enter the name, the type, the position, if it is mandatory or not and the default value of the custom field and submit

- the custom field immediately appear in the panel
- the new custom field is added to all the requirements assigned with its default value

Edit a custom field
Here is the process to edit a custom field for a requirement:- in the tree, select a root folder
- on the right panel, select the custom field
- click on the edit custom field button

- change the name, the type, the position, if it's mandatory or not and/or the default value of the custom field and submit

- the custom field immediately appears in the panel with new values
- the custom field is updated on all the requirements (except its value)

Delete custom field
Here is the process to delete a custom field for a requirement:- select the root folder in the tree
- on the right panel, select the custom field
- click on the delete custom field button

- confirm and submit

- the custom field immediately disappears from the panel
- the custom field is removed from all the requirements

Toolbar
Create a folder
A folder can be created only under the root node of the tree or another folder nodeHere is the process to create a new folder:
- select the root folder in the tree
- on the right panel, click on the create folder button

- enter the name of the folder and submit
- the folder immediately appears in the tree
Create a report
It may be interesting to export or to print a global report on all the requirements you have.For more details, refer to the Requirements report chapter.
Search requirements
For more details, refer to the Advanced and plain text search chapter.The folder nodes
Tabs
Details
The folder details tab allows one to specify the name of the folder
Coverage
The Coverage tab will display the coverage details of the selected folder in terms of SUTs, specifications (if enabled) and tests.In addition, some advises are given to improve the coverage of the folder:


Statistics
The Statistics tab will display some metrics based on all the requirements included in the current folder and its childs:- A status breakout pie chart showing how many requirements exist for each status
- A priority breakout pie chart showing how many requirements exist for each priority
- A risk breakout pie chart showing how many requirements exist for each risk level

Attachments
For more details, refer to the Attachment chapter.Toolbar
Create a folder
A folder can be created only under the root folder node or another folder node.Here is the process to create a new folder:
- select a folder node in the tree
- on the right panel, click on the create folder button
- enter the name of the folder and submit
- the folder immediately appears in the tree
Delete a folder
You can delete a folder by just clicking this button
WARNING: deleting a folder will delete all objects linked to this folder (i.e. underlying folders and requirements etc.)
Empty a folder
You can empty a folder by just clicking this button
WARNING: emptying a folder will delete all objects linked to its childs (i.e. underlying folders and requirements etc.)
Copy a folder
You can copy a folder by just clicking this buttonNote that the copy process will recursively copy also all the inner items (including their links).
Move a folder
You can move a folder by just clicking this buttonCreate a requirement
A requirement can be created only under a folder node.Here is the process to create a new requirement:
- select a folder in the tree (create one if necessary)
- on the right panel, click on the create requirement button

- a dialog box is displayed

- pick a requirement type
- if required, pick a requirement category
- enter the name of the requirement
- enter the description of the requirement. You can use the formatting tools (wiki-style) to format the text.
- select the status of the requirement (at creation time, you can only choose New or Ack)
- select the priority of the requirement
- click on submit
- the requirement immediately appears in the tree

Generate specifications
You can generate specifications from requirements by just clicking this buttonCreate a report
It may be interesting to export or to print a report on all the requirements under a specific folder.For more details, refer to the Requirements report chapter.
The Requirements nodes
Tabs
Details
The Requirement Details tab allows one to specify the type, the category, the name, the description, the status, and the priority of the requirementIf some custom fields have been configured, they will appear here as well (positionned as specified).

Risk analysis
If you wish, you can set a risk to each requirement.This is an optional task but it is advised as it can help greatly for reporting but also when it's about selecting/prioritizing tests to execute.
Indeed, when you will create a test campaign, you'll be able to let the system automatically select all tests covering requirements meeting certain criteria such as risk.
There are 2 different ways to set the risk on a requirement:
Setting the risk manually:
To do so:
- click on the Set manually link
- a dialog box is displayed
- pick a risk

- press the Return button
- Don't forget to submit from the Details tab!

Setting the risk using the Risk Analysis wizard:
To do so:
- click on the Risk Analysis wizard link
- a dialog box is displayed
- pick the most appropriate answer to the 4 questions asked

- the probability is automatically calculated from the 3 first questions
- press the Return button
- Don't forget to submit from the Details tab!

The risk is calculated from the failure probability and the impact of a failure on the functionality.
In addition, the probability is calculated from the Frequency at which the feature will be used, the Complexity of its implementation and the Maturity of the its components.
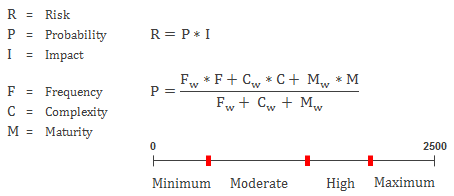
As you can see, the formula includes some customizable weights that you can set as you want to polish the importance you want to give to each parameter.
These weights can be set in the server settings.
In addition, the probability is calculated from the Frequency at which the feature will be used, the Complexity of its implementation and the Maturity of the its components.
As you can see, the formula includes some customizable weights that you can set as you want to polish the importance you want to give to each parameter.
These weights can be set in the server settings.
Once you have set a risk to a requirement, it will appear in the Details tab as Maximum Risk:
It will also be visible directly in the requirements tree in a dedicated column:

Coverage
The Coverage tab will display the coverage details of the selected requirement in terms of SUT, specifications (if enabled) and tests.In addition, some advises are given to improve the coverage of the requirement:


To modify the list of specifications linked to the current requirement, just un-toggle the tree filter
If the Specification module is not activated in the server settings, you'll not be able to select specifications. Instead, you'll be able to select directly some tests.
To modify the list of tests linked to the current requirement, just un-toggle the tree filter
TIP: If you have to select hundreds of tests this task can be painful and error prone though.
Hopefully, the filtering toolbar at the top of the tree can help you selecting more intelligently the tests.
For more details, refer to the Filtering chapter.
Hopefully, the filtering toolbar at the top of the tree can help you selecting more intelligently the tests.
For more details, refer to the Filtering chapter.
Related Requirements
The Related Requirements tab will display the requirements manually linked with the currently selected requirement.If you have the right to do so, you can modify this selection of related requirements.

Bugs
This tab shows all the bugs that have been found on the selected requirement.
Attachments
For more details, refer to the Attachment chapter.Revisions (versioning)
This tab shows all the revisions of the selected requirement.You can open a specific revision of the requirement by selecting a revision in the list and clicking on the open button.

Changes (audit log)
XStudio allows tracking any changes on a particular object.To check the history of a requirement:
- select the requirement in the tree
- open the Changes tab on the right panel
- the panel shows a table gathering all the dated changes.
On a requirement you will get a panel similar to this one:
TIP: You can directly edit a user's details by clicking on his/her name in the changes table.
Toolbar
Delete a requirement
You can delete a requirement by just clicking this buttonCopy a requirement
You can copy a requirement by just clicking this buttonThe copy process will copy also the links in between the selected requirement and its SUTs, specifications or tests.