Getting started
XQual is an ALM solution including one of the most powerful versatile test management software in the market (that can drive any kind of tests, manual or automated). XQual makes the management of your assets (requirements, tests, bugs, etc.) trivial and less costly to maintain.
if you installed XQual on a web server, you'll need a web browser and nothing more.
Each browser has its own way to handle Java Web Start applications but in all cases when you'll start XQual, the
.JNLP will need to be executed using the Java Web Start Launcher you have on your computer (often called Javaws).
This is part of the Java Runtime of your browser.You also have the possibility to install a shortcut on your desktop:
Control Panel > Programs > Java > General > Temporary files > ViewThen select XQual Studio in the list and click on the
Install shortcut button:
From now on, you can just start XQual by clicking on the icon you have on your desktop.
Data-model
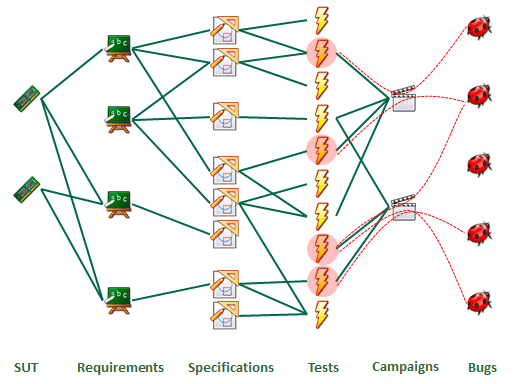
manages ALL the objects involved in the life-cycle of your projects:- Products/SUTs (System Under Tests)
- Business requirements
- Functional/technical specifications
- Tests and Test cases
- Test campaigns and campaign sessions
- Bugs
- Documentation
- Projects
Of course all these objects are linked together so that quality metrics can be easily extracted.
Here is the data-model XQual is based on:

In addition, XQual includes a flexible right-management module allowing to assign user profiles to users and to manage teams of users so that they have access to different projects.
Components
XQual is made of several components including:- A management console (through a web interface and/or by installing heavy clients available for Windows, Linux or MacOSX): XQual
- Several optional agents: XAgent. The agents can be used to execute the tests on remote computers
- A utility to drive test execution: XContinuousIntegration. This is a command line tool that can be called for instance by any continuous integration system (Bamboo, Hudson, Jenkins, TeamCity etc.) and that will trigger the execution of some tests at the end of a build
- An SDK API allowing to develop your own custom launcher to interface XQual with any kind of tests (even proprietary)
- An REST-API Server allowing to programmatically communicate with XQual's database
- An iPhone Application allowing to get some reports on your current projects directly from your iPhone
- An iPad Application allowing to get some reports on your current projects directly from your favorite tablet
XQual URL
If you installed XQual web package you can send some XQual URL (for instance via email) so that the recipient can open XQual directly on the right object by just clicking this URL.- If XQual is already opened, it will just automatically select the right tree and object
- If XQual is not opened (even never been launched on this computer), it will run XQual and open directly the right object
xstudio.jsp correctly configured (exactly the same way as the xstudio.jnlp file) on the server.A typical XQual URL looks like:
http://<your server>/bin/xstudio.jsp?id=D_123 for a bug,http://<your server>/bin/xstudio.jsp?id=T_123 for a test,etc. You can find the a complete reference list of prefix here: here
To make it easier to share such URLs you can retrieve the shareable URL of an item directly from its Details tab:

This tab will automatically include a Shareable URL text that you can copy in your clipboard using the Copy to Clipboard button
This way, you can select an item in any tree, copy the shareable URL and share it by email, chat etc. with a colleague of yours.
People who will receive this URL will be able to click on it to open directly XQual on the right page.
User authentication
Access to XQual is restricted to users who have suitable credentials. A login process is used to authenticate the user before he can use the system. Each user is then granted with a list of permissions depending on its user profile and the team he's member of. All the passwords are stored encrypted on the server to ensure a maximum security.
By default, an admin account is created (at installation time). By default, the admin's password is
password.
The admin has ALL the permissions on the system.
If you leave the default selection (
[User's language])in the language drop-down menu, the language that you indicated in your settings will be used and XQual's interface will be fully localized using this language.
You can also force to load XQual in a different language by just picking it up in the drop-down menu.
If you do not know your credentials, contact your XQual Administrator.
The GUI
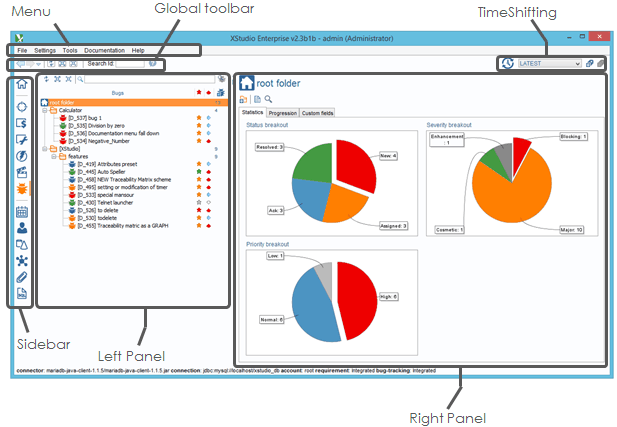
XQual's GUI is rather simple and based on a clean design:- a menu
- a global toolbar
- a left vertical pane including all the trees (each tree includes its own dedicated toolbar)
- a left panel including the currently selected tree
- a right panel including:
- some detailed information concerning the element selected in the tree
- a toolbar allowing the user to execute some specific actions on the element selected in the tree.

Menu
The menu provides the following functionalities:- Files
- Exit: to exit the application
- Log off: to log off and returns to the login screen
- Settings
- Server Settings: that's where are all the server settings are stored
- User Preferences: Some of the settings can be overloaded by the user preferences
- Internationalization: to customize the week-ends and holidays for each country (language settings are customized per user)
- Tools
- Import from Excel: to import SUT, Requirements, Specifications, Tests, Test cases, Bugs, Assets from an Excel file. See more details in our Import data tutorial
- Import from CSV: to import tests and test cases from a CSV file
- Import from XML: to import requirements, specifications, tests and test case from an XML file
- Check database Integrity: to check the sanity of your database
- Check coverage Integrity: to check the sanity of your coverage
- Check statistics entries: to check there is no duplicate or inconsistencies in historic statistics in the systems
- Check formatted strings (XHTML compliance): to check the validity of the formatting of all the rich-texts in the system.
- check TimeShifting data: to check there is no inconsistencies in the TimeShifting data (no duplicate, LATEST timetag set on the last revision of all the objects etc.)
- Search and delete orphan images: to search in the database if there are some images that are not referenced anywhere.
- Run checks when enabling specifications tree server side: If you enabled the specifications tree on the server configuration, this tool will cleanup the database by removing all the former links in between the requirements and the tests.
- Run checks when disabling specifications tree server side: If you disabled the specifications tree on the server configuration, this tool will cleanup the database by removing all the former links in between the requirements and the specifications and in between the specifications and the tests. It also proposes to rebuild links automatically from the former matrix but removing the specifications intermediates.
- Cleanup: to cleanup the database by removing old stats, attachments, campaign session, change tracking and also to check and auto-correct coverage metrics and deprecated links
- Audit log: it allows you as admin to view all the changes that happened on any object
- Documentation
- Documentation: to open the online documentation
- Help
- About: to get information about the licensing, the support and plugins activated, the libraries used and all the system properties
Global toolbar
The global toolbar is available all the time and allows performing several operations:
- Navigating through the items the user recently worked with (back and forth)
- Refresh ALL the trees
- Expand ALL the trees
- Collapse ALL the trees
- Search an object from all the trees using its Id. See the dedicated chapter about searching objects by id
- Timetag XQual keeps automatically a version of your items when you modify them. Wish to get back in time the way it was 1 year ago? just select a Timetag thanks to the Timeshifting selector.
Area buttons
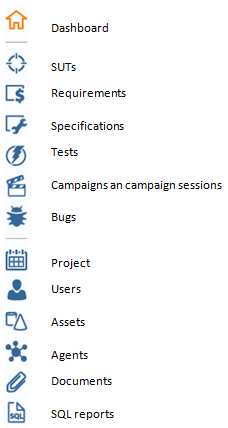
The Area buttons are available on the very left of the main window and give access to the different trees available in XQual:
Left panel
The left panel will display the objects tree corresponding to the area selected. It can be any of the following trees, documented each in dedicated sections:- Dashboard
- SUTs
- Requirements
- Specifications
- Test and test cases
- Campaigns and campaign sessions
- Bugs
- Projects
- Users
- Assets
- Agents
- Documents
- SQL Reports
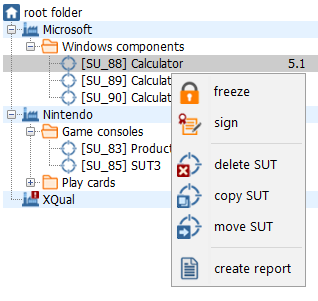
Contextual menus
Right-clicking on any item in a tree in the left panel will popup a contextual menu containing usual options/actions available for the selected item:
Right panel
The right panel will display the information about the last item selected in the tree in the left panel.Wiki-formatted texts
When it's needed to store formatted text (i.e. for descriptions for instance), XQual uses Wiki-formatted texts. These widgets are more reliable and store the information in a much cleaner format than the WISIWIG editors, hence improving performances and storage in the database.Using these widgets is rather simple:
- First of all, switch to Edit mode by clicking on the Edit
 button
 - Type your text
- Select a section of text
- Click on a style button to apply the effect to the section
- The section becomes surrounded by the appropriate tags
- Different styling options are available: bold, italic, underline but also ability to insert some clickable URLs, images or even take some screenshots directly from here
- Bullets or numbered lists and tables are also available

The tags are visible on the editor but you can press the View

Note on anchors usage: to make a text section a valid anchor, you need to provide valid and correctly formatted URLs.
Http, https and ftp protocols are supported. Local or remote files are also supported using the following standard syntaxes:
Http, https and ftp protocols are supported. Local or remote files are also supported using the following standard syntaxes:
- https://www.xqual.com
- https://www.xqual.com
- ftp://ftp.xqual.com
- file:///C:/tmp/spreadsheet.xslx (3 slash prefix)
- file://///remote/folder/tmp/spreadsheet.xslx (5 slash prefix)
You can also capture some screenshots using the integrated tool by using these two (or more) buttons:
 to capture screenshot of a selectable area on any screen and insert it in the text area.
 to capture a screenshot of the screen 1 and insert it in the text area.
 to capture a screenshot of the screen 2 and insert it in the text area.
 to capture a screenshot of all the screens at once and insert it in the text area.
- Click on the button

- Move and resize the semi-transparent panel
- Submit the capture by clicking the big camera button in the center of the semi-transparent panel
- The name of the picture becomes surrounded by the appropriate tags

The tags are visible on the editor but you can press the Preview

Icons
Here are the main entities managed in XQual's Data Model and there associated icon:| Entity | Function |
Several companies will be involved in the testing process:
|
|
Each company have users that will be involved in the testing process as:
|
|
| Each team have members (users) and have access to some specific data in each tree in XQual. A team can be considered as a project too. As a member of a team you'll be able to see only the data handle by the people in that team. | |
| (System Under Test)What we want to test. This can be a software or a Hardware target. | |
| Tests can be run all locally or on any host having XAgent installed and running. All hosts with XQual or XAgent MUST be referenced in the Agent tree. | |
| Features required for the SUT. | |
| Deduced from the requirements, the specifications precisely detail each function of the SUT. | |
| A generic project. | |
| A project is made of tasks that will be spread in different sprints. | |
| Some tasks are associated to a sprint. An intermediate deliverable will come out of each sprint. | |
| Generally, there will be different categories of tests for one single product. A Category is characterized by a unique way to run all the tests under this category. | |
| Tests are developed based on the specifications. Each test must verify one particular item of the specifications. Tests can includes different testcases. | |
| Tests case are developed to describe test procedure | |
| A campaign is a selection of tests. A campaign can be executed several times on different versions of the product: these executions are called Campaign Session. | |
| A campaign session is an execution instance of a campaign. This includes results from the execution associated with specific configuration of execution. | |
| The Test manager defines some Sessions coming each with one simple charter and assign the sessions to the testers. | |
| Campaign sessions will highlight the presence of defects in the SUT. Several failures in a Campaign Session may be due to the same defect. | |
| Attachement give you the ability to attach some files (whatever the format is) to some entities managed by XQual. | |
| Sql report allows querying the XQual database directly. |
As you will see, XQual is using a lot trees. Trees are flexible and allow managing entities a very flexible way. Each tree will be associated with a toolbar including one or several buttons:
| Tree Button | Action |
| Refresh | |
| Expand all | |
| Expand all exept for leaves | |
| Collapse all | |
| Show closed sprints (available for sprints) | |
| Show closed tasks (available for tasks) | |
| Show closed defects (available for defects) | |
| Display the previous/next page | |
| Set a SUTs filter | |
| Apply the SUTs filter | |
| Set a requirement filter | |
| Apply the requirement filter | |
| Set a requirement attributes and properties filter | |
| Apply the requirement attributes and properties filter | |
| Set a tests attributes and properties filter | |
| Apply the tests attributes and properties filter | |
| Set an asset filter | |
| Apply the asset filter | |
| Show all rows/Show only filtered rows/Clear row filter | |
| Show all nodes/Show only selected nodes |
All these icons will be used along all XQual's GUI. They may be associated with additional overlay icons which meaning is the following:
| Overlay | Represents |
| Create/Add | |
| Copy | |
| Move | |
| Link | |
| Remove | |
| Download | |
| Open | |
| Generate | |
| Merge several sessions | |
| Generate residual campagn (containing only tests at risk) | |
| Search | |
| Select | |
| Show items (available for closable items such as sprints, tasks or defects) | |
| Import/Export | |
| Export | |
| Import | |
| Move | |
| Move to the right | |
| Move to the left | |
| Move up | |
| Move down | |
| States/Properties | |
| Initialized | |
| Armed | |
| Paused | |
| Stopped | |
| Running | |
| Special item (read-only) | |
| Rights | |
| Creation right | |
| Deletion right | |
| Moving right | |
| Editing right | |
| Viewing right | |
Start option
XQual, XAgent and XSubAgent can be started using specific options.In addition, XQual and XAgent can be started from a browser.
Here are the different options you can specify either in the command line (if you start the fat client) or in the JNLP file (if you start the application from your web-browser):
| Fat client options |
Web access JNLP |
|
| XQual |
Options:
|
<argument>--id</argument>
|
| XAgent |
Options:
|
<argument>--alias</argument>
|
| XContinuous Integration |
--campaignId <campaignId>
|
|
| XReportGenerator |
--campaignSessionId <campaignSessionId>
|
|
| XReportDebugger |
No option
|
|
| XImporter |
--inputFilePath <inputFilePath>
|
In the JNLP files, you MUST provide a value for each argument and no additional argument can be added (this is prohibited by Java for security reasons).
Most of the arguments provided to the fat clients are optional.
Among all the usual ones, these 5 options are available on most of the command line:
- --id allows starting the application with an item pre-selected
- --forceIpv4 is useful in some cases to workaround some issues when sending notification emails. Most of the time, it's recommended to set it to true.
-
--headless allows starting the application without any GUI. This is useful especially to run the application on a headless linux OS for instance.
If you use this option from Windows, it's a good idea to run the console version of the application to get some traces (or you'll have absolutely no feedback from the application).
-
--overrideLf allows applying a different java skin to the application.
The className you can provide to override the default look and feel is a class name supported by your JRE AND your OS.
For instance, if you wish to use the Java cross-platform look'n feel you can provide the following class name:
javax.swing.plaf.metal.MetalLookAndFeel.
For more information on Java look'n feels, please check Oracle's website.
- --options is useful to pass generic java VM options.
Other options:
- --login is useful only when:
- XQual is connected to one or several third-party systems requiring an authentication
- You did not provide any username and password in the server settings (so you disabled the preliminary connection settings checking)
- The connection is made exclusively using the username and passwords provided by each user in their user preferences
More details are available about specific syntaxes in the dedicated documentations sections on XAgent and XContinuousIntegration.

